
0
Owner's of the 3M Power Hammer 3M Cut-off Wheel Tool gave it a score of 0 out of 5. Here's how the scores stacked up:

6
Safety Precautions
1. Read all instructions before using this tool. All operators must be
fully trained in its use and aware of these safety rules.
2. ThetoolRPMshouldbecheckedonaregularbasis(atshiftchange).
3. Make sure the tool is disconnected from the air supply. Select a
suitable abrasive cut-off wheel and secure it to the mounting shaft
using the wheel retainer and wheel arbor supplied with the tool.
Becarefultocenterthecut-offwheelonthewheelarborbefore
tightening the wheel retainer nut. Do not over tighten the wheel
retainer or you will crack the wheel.
4. Alwayswearrequiredsafetyequipmentwhenusingthistool.
5. Alwaysremovetheairsupplytothetoolbeforetting,adjustingor
removing the abrasive cut-off wheel.
6. Alwaysadoptarmfootingandgripandbeawareoftorque
reaction developed by the tool.
7. Use only 3M approved spare parts.
8. Always ensure the material being worked is firmly fixed to avoid
movement.
9. Checkhoseandttingsregularlyforwear.Donotcarrythetoolby
itshose;alwaysbecarefultopreventthetoolfrombeingstarted
when carrying the tool with the air supply connected.
10.Dustcanbehighlycombustible.Keepworkingareaclean.
11. If tool is serviced or rebuilt check to ensure that the maximum tool
RPM is not exceeded and that there is no excessive tool vibration.
12.Donotexceedmaximumrecommendedairpressure.Usesafety
equipmentasrecommended.
13. Prior to installing any abrasive cut-off wheel, always check that it’s
markedmaximumoperatingspeedisequalorhigherthantherated
speed of this tool.
14. The tool is not electrically insulated. Do not use where there is a
possibility of contact with live electricity, gas pipes, and/or water
pipes.
15.Takecaretoavoidentanglementwiththemovingpartsofthetool
withclothing,ties,hair,cleaningragsorloosehangingobjects.If
entangled, stop air supply immediately to avoid contact with moving
tool parts.
16.Keephandsclearofthespinningcut-offwheelduringuse.
17. If the tool appears to malfunction, remove from use immediately and
arrange for service and repair.
18. Do not allow the tool to free spin without taking precautions to
protectanypersonsorobjectsfromtheruptureoftheabrasive
cut-off wheel.
19.Immediatelyreleasethestarthandleintheeventofanydisruption
ofpressure;donotattempttore-startuntilthedisruptionhasbeen
corrected.
20.Whentoolisnotinuse,storeinaclean,dryenvironmentfreeof
debris and in a manner that ensures that the cutting-off wheel is
not damaged.
21.Fixtureworkpiecesuchthatthecutslotiskeptataconstantor
increasing width during the operation.
22.Operatetoolinawelllitworkarea.
23.RecycleordisposeoftoolaccordingtoLocal,State,andFederal
regulations.
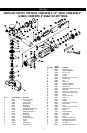
3M™ Cut-Off Wheel
3M™ Cut-Off Wheels are designed for use on the 3M™ Cut-Off Wheel Tools.
Cut-OffWheelToolModelnumber20235isdesignedforusewith5”diameter
and125mmdiameterabrasivewheels.Whenmountingnewunusedabrasive
wheels,ensurethetruewheeldiameterisnolargerthan127.5mmandno
smallerthan122.5mm.
See3MASDAccessorycatalog61-5002-8098-9andFantasticFinishes&
Morecatalog61-5002-8097-1foradditionalBack-UpPadsandAccessories.
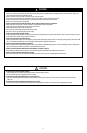
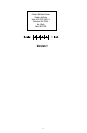
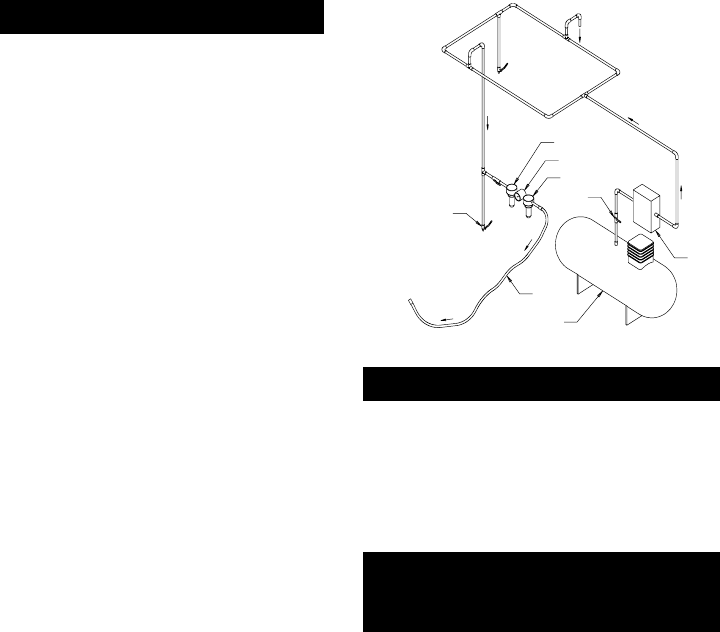
Figure 1
Closed Loop Pipe System
Sloped in the direction of air flow
Drain Leg
Ball Valve
To Tool Station
Filter
Drain Valve
Regulator
Lubricator
Ball
Valve
Ball Valve
Air Flow
Air Dryer
Air Compressor
and Tank
Air Hose
To Coupler
at or near Tool
Cut-Off Tools
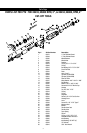
Removing and Mounting
Cut-Off Wheels on tool
1. Disconnect air line from tool.
2.Usethehexwrenchforthe3”and4”cut-offtoolandtheatwrenchfor
the4-1/2”,5”,and6”cut-offtoolstosecurethetoolspindle.
3.Usetheatwrenchforthe3”and4”cut-offtoolandtheadjustable
spannerwrenchforthe4-1/2”,5”and6”cut-offtoolstoturntheouter
wheel retainer counter clockwise.
4. After the old cut-off wheel has been removed from the tool, inspect
the threaded shaft to ensure that the threads are free of debris and
undamaged.
5.Placethenewcut-offwheelontheshaftwiththecenterholealignedon
the centering lip of the wheel arbor.
6.Securethetoolspindleandwheelretainerwiththeappropriate
wrenchesandtightenthewheelretainer.Becarefulnottoovertighten
the wheel retainer or the cut-off wheel could be damaged.


Find Your Products By Category
Please Login
