
0
Owner's of the Black & Decker Freezer Gecko Grip AccuMark Level gave it a score of 0 out of 5. Here's how the scores stacked up:
WARNING: Read and understand all instructions. Failure to follow all instructions listed
below may result in electric shock, fire and/or serious personal injury.
SAVE THESE INSTRUCTIONS
SAFETY GUIDELINES - DEFINITIONS
It is important for you to read and understand this manual.
The information it contains relates to protecting YOUR SAFETY and PREVENTING PROB-
LEMS. The symbols below are used to help you recognize this information.
DANGER: Indicates an imminently hazardous situation which, if not avoided, will result
in death or serious injury.
WARNING: Indicates a potentially hazardous situation which, if not avoided, could
result in death or serious injury.
CAUTION: Indicates a potentially hazardous situation which, if not avoided, may result
in minor or moderate injury.
CAUTION: Used without the safety alert symbol indicates a potentially hazardous situation
which, if not avoided, may result in property damage.
Safety Instructions
• Do not operate the stud sensor in explosive atmospheres, such as in the presence of
flammable liquids, gases, or dust.
• Use the stud sensor only with AAA batteries. Use of any other batteries may create a risk of
fire.
CAUTION: Material thickness, type of material, moisture content, and other variables can
effect sensing results. The sensor may detect electric wiring or pipes in the same manner
that studs are detected depending on their location to the wall surface. Use caution when
drilling, nailing or cutting into walls, floors and ceilings which may contain electrical wiring or
pipes. Because studs are normally spaced 16 inches (406 mm) or 24 inches (610 mm)
apart and are usually 1-1/2 inches (38 mm) wide, beware of anything closer together or of
a different width. WARNING: Always turn off the power when working near
electrical wires.
Operation -
Using the Level
Gecko Grip levels are designed with slider pads (1) and non-slip, grip assist pads (2). This
unique feature is helpful when using the level on vertical surfaces.
To use this feature:
• Place the level on a vertical surface. The slider pads will allow you to easily align the bubble
to a level position (centered between the two lines in the spirit vial).
• Press in on the level to allow the grip assist pads to grip to the vertical surface.
• Holding the level with one hand, use a pencil in your free hand to make whatever location
markings are needed.
CAUTION: Do not let go of the level. The grip assist pads are not intended to hold the
level to the wall by themselves.
NOTE: Optimal Gecko Grip performance will be achieved when:
• The pads are free of dust and dirt. Performance of the grip assist pads may be restored by
wiping them using a damp cloth.
• Surface is flat allowing both grip assist pads to contact surface.
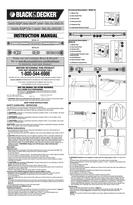
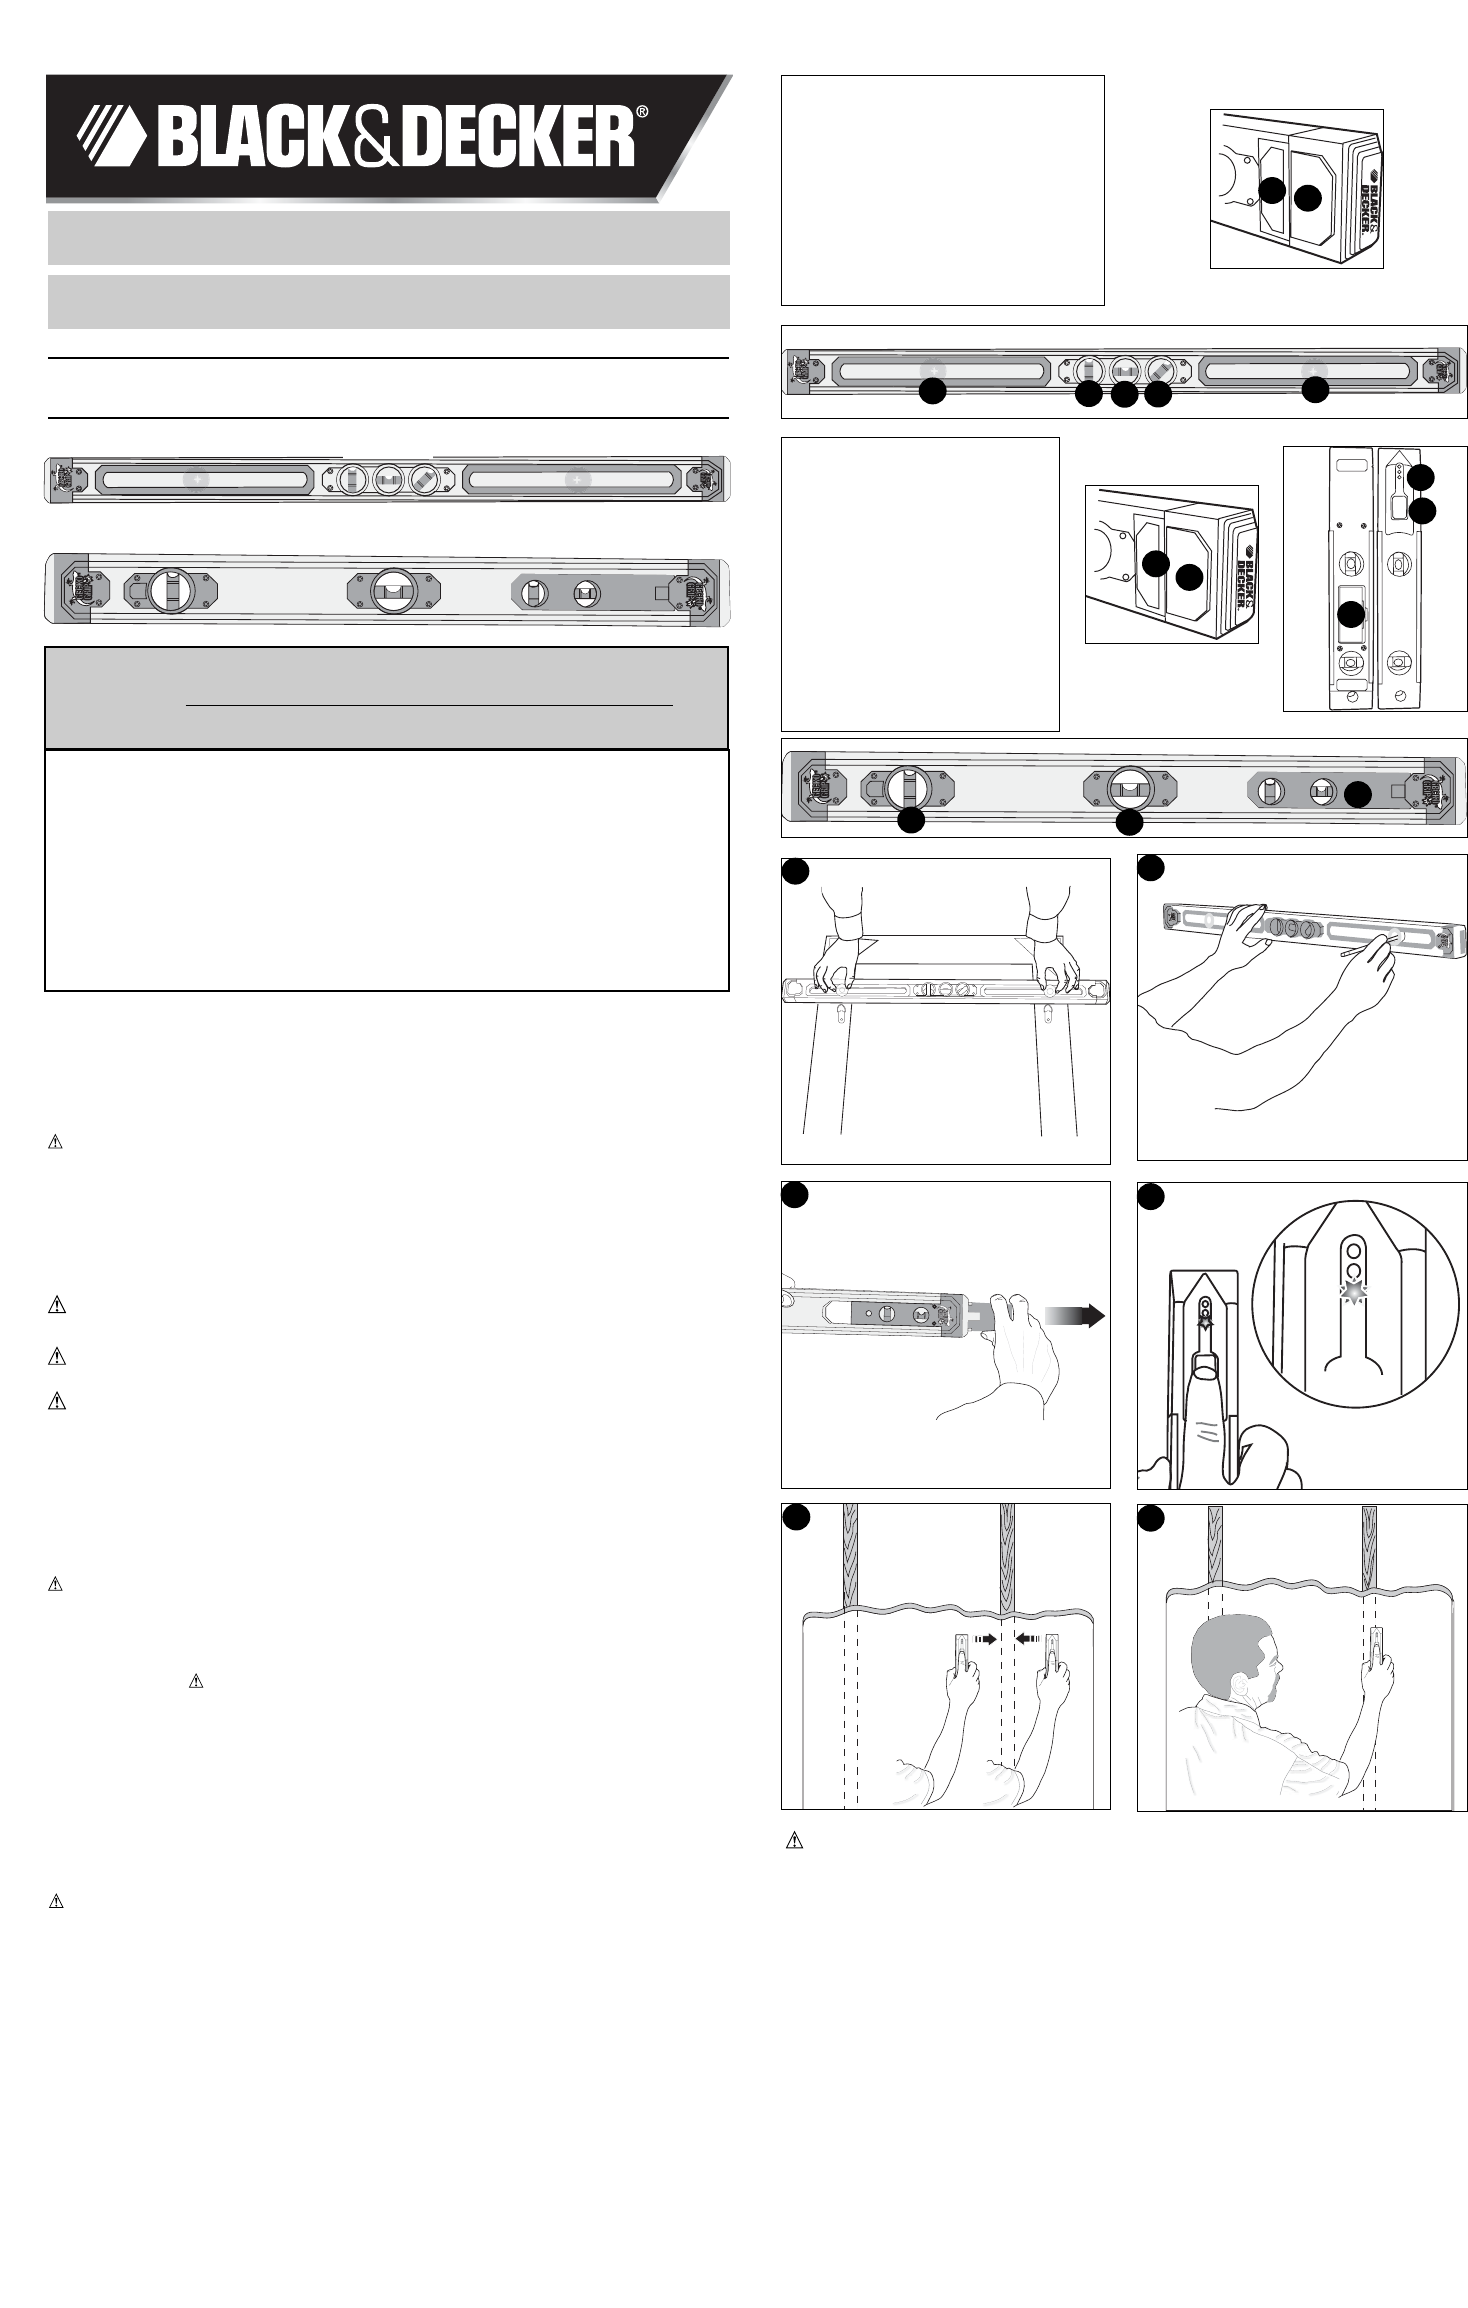
Using the ACCU MARK Adjustable Marking Targets (BDSL10 only)
Adjustable marking targets (6) are located on both ends of the level. They are used for
transferring and or repeating a measurement from one location to another.
To use this feature:
• Align the targets with the wall mounts of the object you want to hang on a wall as shown in
figure A.
• To transfer that measurement to your work area, ensure bubble is aligned to a level position
and mark the wall mount locations through the slots in the targets using a pencil as shown in
figure B.
• Install appropriate fasteners to wall and hang object.
Using the Stud Sensor (BDSL30 only)
Installing the Batteries
• Remove the small torpedo level (7) from the larger 2 foot (610mm) level as shown in figure C.
• Remove and discard the label over the battery compartment cover.
• Open the battery compartment cover (10). Insert 2 fresh 1.5 volt AAA batteries (not
included) making sure to match (+) and (-) terminals correctly.
• Replace battery compartment cover and click into place.
WARNING: Batteries can explode, or leak, and can cause injury or fire. To reduce this
risk:
• Carefully follow all instructions and warnings on the battery label and package.
• Always insert batteries correctly with regard to polarity (+ and -), marked on the battery and
the equipment.
• Do not short battery terminals.
• Do not charge batteries.
• Do not mix old and new batteries. Replace all of them at the same time with new batteries of
the same brand and type.
• Remove dead batteries immediately and dispose of per local codes.
• Do not dispose of batteries in fire.
• Keep batteries out of reach of children.
• Remove batteries if the device will not be used for several months.
“Transporting batteries can possibly cause fires if the battery terminals inadvertently
come in contact with conductive materials such as keys, coins, hand tools and the like.
The US Department of Transportation Hazardous Material Regulations (HMR) actually
prohibit transporting batteries in commerce or on airplanes (i.e. packed in suitcases and
carry on luggage) UNLESS they are properly protected from short circuits. So when
transporting individual batteries, make sure that the battery terminals are protected and
well insulated from materials that could contact them and cause a short circuit.”
Stud Sensing
• Remove the stud sensor/level as shown in figure C.
• Place sensor on wall and turn unit on by pressing in and holding the ON button (8). The
bottom red LED will light (figure D). The green LED will light momentarily while unit
calibrates.
NOTE: The red LED will flash when batteries are weak. Replace batteries for accurate stud
sensing.
VEA EL ESPAÑOL EN LA CONTRAPORTADA.
SAVE THIS MANUAL FOR FUTURE REFERENCE.
INSTRUCTIVO DE OPERACIÓN, CENTROS DE SERVICIO Y PÓLIZA
DE GARANTÍA. ADVERTENCIA: LÉASE ESTE INSTRUCTIVO ANTES
DE USAR EL PRODUCTO.
CAT. NO. BDSL10,BDSL30 FORM NO. 90521629
Copyright 2007 Black & Decker (MAY ‘07) Printed in China
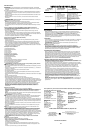
Functional Description - BDSL10
1.) Slider Pad
2.) Grip Assist Pad
3.) Vertical Vial
4.) Horizontal Vial
5.) Diagonal Vial
6.) Adjustable Marking Target
T
T
HANK
HANK
YOU
YOU
FOR
FOR
CHOOSING
CHOOSING
B
B
LACK
LACK
&
&
D
D
ECKER
ECKER
!
!
G
G
O
O
T
T
O
O
WWW
WWW
.B
.B
LACKAND
LACKAND
D
D
ECKER
ECKER
.
.
COM
COM
/N
/N
EW
EW
O
O
WNER
WNER
T
T
O
O
REGISTER
REGISTER
YOUR
YOUR
NEW
NEW
PRODUCT
PRODUCT
.
.
BEFORE RETURNING THIS PRODUCT
FOR ANY REASON PLEASE CALL
1-800-544-6986
BEFORE YOU CALL, HAVE THE CATALOG No. AND DATE CODE AVAILABLE. IN MOST CASES, A
BLACK & DECKER REPRESENTATIVE CAN RESOLVE THE PROBLEM OVER THE PHONE.
IF YOU HAVE A SUGGESTION OR COMMENT, GIVE US A CALL.
YOUR FEEDBACK IS VITAL TO BLACK & DECKER.
INSTRUCTION MANUAL
GG
GG
ee
ee
cc
cc
kk
kk
oo
oo
GG
GG
rr
rr
ii
ii
pp
pp
TT
TT
MM
MM
AA
AA
cc
cc
cc
cc
uu
uu
MM
MM
aa
aa
rr
rr
kk
kk
TT
TT
MM
MM
LL
LL
ee
ee
vv
vv
ee
ee
ll
ll
--
--
CC
CC
aa
aa
tt
tt
..
..
NN
NN
oo
oo
..
..
BB
BB
DD
DD
SS
SS
LL
LL
11
11
00
00
GG
GG
ee
ee
cc
cc
kk
kk
oo
oo
GG
GG
rr
rr
ii
ii
pp
pp
TT
TT
MM
MM
33
33
ii
ii
nn
nn
11
11
LL
LL
ee
ee
vv
vv
ee
ee
ll
ll
--
--
CC
CC
aa
aa
tt
tt
..
..
NN
NN
oo
oo
..
..
BB
BB
DD
DD
SS
SS
LL
LL
33
33
00
00
BDSL10
BDSL30
Functional Description -
BDSL30
1.) Slider Pad
2.) Grip Assist Pad
3.) Vertical Vial
4.) Horizontal Vial
7.) Removable Torpedo Level
w/Stud Finder
8.) On/Off Button
9.) Stud Indicator LEDs
10.) Battery Compartment
6
4
3
9
7
4
3
10
2
6
5
1
2
8
x
x
x
D
E
C
A
F
1
B


Find Your Products By Category
Please Login
