
4.0
Owner's of the DeWalt Automobile Accessories Worksite Radio With Built-In Charger gave it a score of 4.0 out of 5. Here's how the scores stacked up:

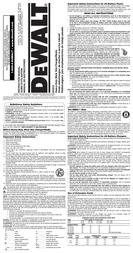
10A 4.0 2.5 1.6 1.1
50 15A 6.0 3.8 2.3 1.6
Foot 20A 8.0 5.0 3.1 2.1
30A 12.0 7.5 4.7 3.2
Extension
Cord Amp Voltage Drop
Length Load 16 AWG 14 AWG 12 AWG 10 AWG
10A 8.0 5.0 3.1 2.1
100 15A 12.0 7.5 4.7 3.2
Foot 20A 16.0 10.0 6.2 4.2
30A 24.0 15.0 9.3 6.3
10A 12.0 7.5 4.7 3.2
150 15A 18.0 11.3 7.0 4.7
Foot 20A 24.0 15.0 9.3 6.3
30A 36.0 22.5 14.0 9.5
• Do not place any object on top of charger/radio or place the charger/radio on a soft
surface that might block the ventilation slots and result in excessive internal heat.
Place the charger/radio in a position away from any heat source.
• Do not operate charger/radio with a damaged cord or plug — have them replaced
immediately.
• Do not operate the charger/radio if it has received a sharp blow, been dropped, or
otherwise damaged in any way. Take it to an authorized service center.
• Do not disassemble charger/radio. Take it to an authorized service center when service
or repair is required. Incorrect reassembly may result in a risk of electric shock, electrocution
or fire.
• Disconnect the charger/radio from the outlet before attempting any cleaning. This will
reduce the risk of electric shock. Removing the battery pack will not reduce this risk.
• NEVER attempt to connect 2 charger/radios together.
• This charger/radio is designed to operate on 120 Volts, 60 Hz AC. It also operates on
D
EWALT battery packs. Do not use any other voltage.
SAVE THESE INSTRUCTIONS
Charger/Radio
The DC012 will charge 7.2–18 Volt DEWALT battery packs and will play using 12–18 Volt
D
EWALT battery packs. Your battery may also be charged in DEWALT 1-hour chargers, 15-minute
chargers or vehicular 12-volt charger. Be sure to read all safety instructions before using your
charger. Consult the chart in this manual for compatibility of chargers and battery packs.
Charging Procedure (Fig. 1)
DANGER: Electrocution hazard. 120 volts present at charging terminals. Do not probe with
conductive objects. Danger of electric shock or electrocution. Keep battery door closed and
latched at all times
1. Plug the charger/radio into an appropriate AC power outlet or generator.
2. Insert the battery pack into the charging receptacle (I). Make sure the pack is fully seated in
the charger/radio, close the rear door and fasten the latch (H).
3. The red light on the front of the radio (J) will blink continuously indicating that the charging
process has started.
4. The completion of charge will be indicated by the red light remaining ON continuously.
Indicator Light Operation
Charge Indicators
The charger/radio is designed to detect certain problems that can arise with battery packs.
Problems are indicated by the red light flashing at a fast rate. If this occurs, re-insert battery
pack into the charger/radio. If the problem persists, try a different battery pack to determine if
the charger/radio is OK. If the new pack charges correctly, then the original pack is defective and
should be returned to a service center or other collection site for recycling. If the new battery pack
elicits the same trouble indication as the original, have the charger/radio tested at an authorized
service center.
HOT/COLD PACK DELAY
The charger/radio has a Hot/Cold Pack Delay feature: when the charger/radio detects a battery
that is hot, it automatically starts a Hot Pack Delay, suspending charging until the battery has
cooled. After the battery has cooled, the charger/radio automatically switches to the Pack
Charging mode. This feature ensures maximum battery life. The red light flashes long, then short
while in the Hot Pack Delay mode.
PROBLEM POWER LINE
The charger/radio has a Problem Power Line indicator. When the charger/radio is used with some
portable power sources such as generators or sources that convert DC to AC, the charger/radio
may temporarily suspend operation, flashing the red light with two fast blinks followed by a
pause. This indicates the power source is out of limits.
LEAVING THE BATTERY PACK IN THE CHARGER/RADIO
The charger/radio and battery pack can be left connected with the red light glowing indefinitely.
The charger/radio will keep the battery pack fresh and fully charged.
NOTE: A battery pack will slowly lose its charge when kept out of the charger/radio. If the battery
pack has not been kept on maintenance charge, it may need to be recharged before use. A
battery pack may also slowly lose its charge if left in a charger/radio that is not plugged into an
appropriate AC source.
WEAK BATTERY PACKS: The charger/radio can also detect a weak battery. Such batteries
are still usable but should not be expected to perform as much work. In such cases, about 10
seconds after battery insertion, the charger/radio will beep rapidly 8 times to indicate a weak
battery condition. The charger/radio will then go on to charge the battery to the highest capacity
possible.
Important Charging Notes
1. Longest life and best performance can be obtained if the battery pack is charged when the
air temperature is between 65°F and 75°F (18°- 24°C). DO NOT charge the battery pack in
an air temperature below +40°F (+4.5°C), or above +105°F (+40.5°C). This is important and
will prevent serious damage to the battery pack.
2. The charger/radio and battery pack may become warm to touch while charging. This is a
normal condition, and does not indicate a problem. To facilitate the cooling of the battery pack
after use, avoid placing the charger/radio or battery pack in a warm environment such as in
a metal shed, or an uninsulated trailer.
3. If the battery pack does not charge properly:
a. Check current at receptacle by plugging in a lamp or other appliance.
b. Check to see if receptacle is connected to a light switch which turns power off when you
turn out the lights.
c. Move the charger/radio and battery pack to a location where the surrounding air
temperature is approximately 65°– 75°F (18°–24°C).
d. If charging problems persist, take the tool, battery pack and charger/radio to your local
service center.
4. The battery pack should be recharged when it fails to produce sufficient power on jobs which
were easily done previously. DO NOT CONTINUE to use under these conditions. Follow the
charging procedure. You may also charge a partially used pack whenever you desire with no
adverse affect on the battery pack.
5. Under certain conditions, with the charger/radio plugged into the power supply, the exposed
charging contacts inside the charger can be shorted by foreign material. Foreign materials
of a conductive nature such as, but not limited to, steel wool, aluminum foil, or any buildup
of metallic particles should be kept away from charger/radio cavities. Always keep the
battery door closed when there is no battery pack in the cavity. Unplug charger/radio before
attempting to clean.
6. Do not freeze or immerse the charger/radio in water or any other liquid.
WARNING: Shock hazard. Don’t allow any liquid to get inside the charger/radio. Electric
shock may result.
CAUTION: Never attempt to open the battery pack for any reason. If the plastic housing of
the battery pack breaks or cracks, return to a service center for recycling.
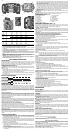
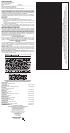
COMPONENTS (FIG. 1, 2)
A. Power/Volume control I. Charging receptable
B. Tuning dial J. Charging light
C. Arrow buttons K. Auxiliary port
D. Mode button L. Coin cell battery door
E. Clock button M. Coin cell battery
F. Memory buttons N. Battery door screw
G. LCD display O. Outlets
H. Battery compartment latch
OPERATING THE RADIO (FIG. 1, 2)
Your charger/radio is equipped with memory capacity in order to store the time and your
selected memory channels. When the radio is in the OFF position, this memory capacity is
powered by one coin cell battery that is included with the charger/radio.
TO INSTALL COIN CELL BATTERY
WARNING: Danger of explosion if battery is incorrectly replaced. When replacing battery,
replace it with the same or equivalent type CR2032. Observe correct polarity (+ and –) when
replacing batteries. Do not store or carry batteries so that metal objects can contact exposed
battery terminals.
WARNING: To reduce the risk of serious personal injury, turn tool off and disconnect
charger/radio from power source before installing/changing battery.
1. Open the battery compartment by lifting the battery compartment latch (H).
2. Turn the screw (N) on the battery door (L) counterclockwise to remove.
3. Press down on the battery door latch and pull to open.
4. Install the coin cell battery (M) according to the diagram inside the coin cell battery area.
5. Replace the battery door, insert the screw and tighten.
6. Securely close the battery compartment.
NOTE: To reset the LCD display, clock and pre-sets, remove the coin cell battery and re-install
them. Follow this procedure if the screen seems to lock in place.
POWER/VOLUME ADJUSTMENT
1. To turn the radio on, turn the dial (A) clockwise until you hear a click.
2. Turn the dial (A) clockwise to increase the volume. To decrease the volume, turn
counterclockwise.
MODE FUNCTION
To choose one of the mode functions (FM1, FM2, AM, or AUX) push the mode button (D) until
the desired function is found. For example, if the radio is on FM1, seen in upper left portion of
LCD display (G), push the mode button three times to change to AUX.
TUNE OR SEEK FUNCTION
There are two tuning methods and one seek method for finding the desired frequency.
To Tune:
Method 1: Push and hold down the right arrow button (C) to quickly move the tuner up the
frequency band. Release the button when the desired channel is reached. To quickly
move the tuner down the frequency band, push and hold down the left arrow button.
Method 2: Turn the tuning dial (B) clockwise to move up the frequency band. Turn the tuning dial
counterclockwise to move down the frequency band.
To Seek:
Press the right arrow button (C) once and release. The tuner frequency will increase to seek the
first radio station with acceptable clarity and stop at that station. The right arrow button may be
pressed again to continue seeking a radio station at higher frequencies. The left arrow button
may be pressed to seek radio stations at lower frequencies. The seek function is available in AM
and FM modes.
TO PROGRAM THE CLOCK
1. Turn power on (see Power/Volume Adjustment).
2. Push and hold clock button (E) until the LCD display (G) begins flashing.
3. Press the appropriate arrow button (HR for hour; MIN for minute) to adjust the time.
NOTE: If you do not press a button within 5 seconds, the clock programming feature will
automatically return to the previous setting.
4. Once the time is set, push and hold the clock button until the time on the LCD display stops
flashing.
TO PROGRAM THE MEMORY BUTTONS
Ten FM and five AM radio stations may be independently set. After programming the buttons,
pressing 1, 2, 3, 4 or 5 will instantly change the frequency to the preset station.
1. Turn power on.
2. Set the radio to desired station (see Tune or Seek Function).
3. Press and hold one of the desired memory buttons (F). The station setting begins flashing in
the LCD display (G). Continue to hold the button down until the flashing stops. The memory
button is now set.
4. Repeat steps 2 and 3 to set the other memory buttons.
Important Radio Notes
1. The radio will run up to 8 hours on a single battery charge using an 18 volt battery. Using
batteries of lower voltage will produce less run time.
2. Reception will vary depending on location and strength of radio signal.
3. Certain generators may cause background noise.
4. AM reception will most likely be clearer when powered by a battery pack.
5. To use the auxiliary port (K), plug the output jack from a CD or iPod
®
*/MP3 player into the
port (Fig. 1). The sound from the external source plays through the speakers of the DC012.
*iPod
®
is a registered trademark of Apple Inc.
MAINTENANCE
Service Notes
This product is not user serviceable. There are no user serviceable parts inside the charger/
radio. Servicing at an authorized service center is required to avoid damage to static sensitive
internal components.
Cleaning
WARNING: Never use solvents or other harsh chemicals for cleaning the non-metallic parts
of the charger/radio. These chemicals may weaken the materials used in these parts. Use a
cloth dampened only with water and mild soap. Never let any liquid get inside the tool; never
immerse any part of the tool into a liquid.
CAUTION: NEVER spray or in any other way apply lubricants or cleaning solvents inside the
tool. This can seriously affect the life and performance of the tool.
CHARGER/RADIO CLEANING INSTRUCTIONS
WARNING: Disconnect the charger/radio from the AC outlet before cleaning. Dirt and grease
may be removed from the exterior of the charger/radio using a cloth or soft non-metallic brush.
Do not use water or any cleaning solutions.
Repairs
To assure product SAFETY and RELIABILITY, repairs, maintenance and adjustments (including
brush inspection and replacement) should be performed by a D
EWALT factory service center,
a D
EWALT authorized service center or other qualified service personnel. Always use identical
replacement parts.
Three Year Limited Warranty
DEWALT will repair, without charge, any defects due to faulty materials or workmanship for
three years from the date of purchase. This warranty does not cover part failure due to normal
wear or tool abuse. For further detail of warranty coverage and warranty repair information, visit
www.dewalt.com or call 1-800-4-D
EWALT (1-800-433-9258). This warranty does not apply to
accessories or damage caused where repairs have been made or attempted by others. This
warranty gives you specific legal rights and you may have other rights which vary in certain
states or provinces.
In addition to the warranty, D
EWALT tools are covered by our:
1 YEAR FREE SERVICE
D
EWALT will maintain the tool and replace worn parts caused by normal use, for free, any time
during the first year after purchase.
90 DAY MONEY BACK GUARANTEE
If you are not completely satisfied with the performance of your D
EWALT Power Tool, Laser, or
Nailer for any reason, you can return it within 90 days from the date of purchase with a receipt
for a full refund – no questions asked.
LATIN AMERICA: This warranty does not apply to products sold in Latin America. For products
sold in Latin America, see country specific warranty information contained either in the
packaging, call the local company or see website for warranty information.
FREE WARNING LABEL REPLACEMENT: If your warning labels become illegible or are
missing, call 1-800-4-D
EWALT for a free replacement.
O
FIG 1
FIG 2
B
A
J
K
H
L
N
I
G
E
C
D
F
F
K
J
M


Find Your Products By Category
Please Login
