
0
Owner's of the RCA Clock Radio RCA SmartSnoozeTM gave it a score of 0 out of 5. Here's how the scores stacked up:


SmartSnooze
TM
• This operation allows extra sleep time when the alarm
sounds. The alarm can be turned off temporarily by
pressing SNOOZE or any one of the SmartSnooze
TM
buttons until the snooze period is over.
• SmartSnooze
TM
buttons include: ON/FM/AUX,
TUNE-/HOUR+ and TUNE+/MINUTE+
• Snooze function may be used repeatedly for up to 2
hours. After this, the alarm will turn off until the next
alarm conditions are met.
IMPORTANTE INSTRUCCIONES DE SEGURIDAD
FAVOR DE GUARDAR ESTO PARA UNA REFERENCIA FUTURA
EN/E/F
It is important to read this user manual prior to using your new product for the fi rst time.
Es importante leer este manual antes de usar por vez primera su equipo.
Nous vous recommandons de lire ce manuel d’instructions avant d’utiliser votre nouveau produit pour la première fois.
Product registration
Thank you for purchasing an RCA product. We pride ourselves on the quality and
reliability of all our electronic products but if you ever need service or have a question,
our customer service staff stands ready to help. Contact us at www.rcaaudiovideo.com.
PURCHASE REGISTRATION: Registering On-line will allow us to contact you in the
unlikely event a safety notifi cation is required under the Federal Consumer Safety Act.
Register Online at: WWW.RCAAUDIOVIDEO.COM. Click on Product Registration
and Fill Out the Brief Questionnaire.
Enregisregistro del productotrement du produit
Gracias por comprar un producto RCA. Nos enorgullece la calidad y fi abilidad de todos
nuestros productos electrónicos, pero si alguna vez necesita servicios técnicos o si tiene
alguna pregunta, nuestro personal de atención al cliente está a su disposición para
ayudarle. Comuníquese con nosotros en www.rcaaudiovideo.com. REGISTRO DE COMPRA: El registro en línea nos permitirá
comunicarnos con usted en el caso de tener que enviarle algún aviso de seguridad en virtud de la Ley Federal de Seguridad
del Consumidor. Registre el producto en línea en: WWW.RCAAUDIOVIDEO.COM. Haga clic en Registro del producto y
responda al cuestionario.
Enregistrement du produit
Merci d’avoir acheté un produit RCA. Nous sommes fi ers de la qualité et de la fi abilité de tous nos produits électroniques,
mais en cas de nécessité de réparation ou pour toute question, le personnel de notre service clientèle est prêt à vous aider.
Contactez-nous sur www.rcaaudiovideo.com. ENREGISTREMENT D’ACHAT: Enregistrer votre produit en ligne nous permettra
de communiquer avec vous pour tout avis de sécurité au sujet du produit en vertu du Federal Consumer Safety Act (Loi fédérale
de protection du consommateur). Enregistrez votre produit en ligne sur: WWW.RCAAUDIOVIDEO.COM. Cliquez sur
Enregistrement produit et remplissez le court questionnaire.
user manual
guide de l’utilisateur
manual de usuario
v5.0 (1.0.5.0) (EN_E_F)
Before you begin
Before you begin
Clock
Plugging in for power
• Connect the supplied power adaptor to the unit’s Power
jack, and connect the other end to a convenient wall
outlet.
• Once connected with power, the clock fl ashes. Refer to
the Clock section for instructions on properly setting the
Clock.
Battery back-up operation
• This clock radio is equipped with a timekeeping system
that can be powered with two AA batteries (not
included). The power failure protection circuit will not
operate unless the batteries are installed.
• When normal household power is interrupted or AC/
DC adaptor is unplugged, the battery will power the
clock radio to keep track of time and alarm settings
programmed into memory.
• When the battery backup functions, the digital display
will not light, however, the alarm will still sound during
power interruption if the remaining battery power is
adequate.
• Normal operation will resume after AC power is
restored so you will not have to reset the time or the
alarm.
To install the battery:
1. Remove battery compartment door (located at the
bottom of the radio) by applying thumb pressure to the
tab on battery door and then lift the door out and off
the cabinet.
2. Connect two AA batteries (not included) to the
connector plug.
3. Replace the compartment door.
General controls
Setting clock manually
1. Press and hold Set Time to enter the clock setting
mode.
2. Press HOUR+ and MINUTE+ to adjust the time.
• Press and hold to adjust the time value quickly.
• The digits on the display fl ash in clock setting mode.
• The clock is in 12 hour format. The AM or PM
indicator will illuminate to indicate the current time
setting.
3. Press Set Time again to save the time setting.
Radio
Setting alarm time and Selecting alarm source
1. Press and hold Set Alarm 1/ Set Alarm 2 to select
ALARM 1 or ALARM 2 setting mode.
2. Press HOUR+ and MINUTE+ to set the alarm time.
• Press and hold to decrease or increase the time value
quickly.
• The digits fl ash on the display in alarm time setting
mode.
• The clock is in 12 hour format. The AM or PM indicator
will light to show the current time.
Alarm function
1. Connect your auxiliary source (e.g. mp3 player) to the
AUX input jack on the right side of the unit with an
audio cable (not included).
2. Turn on your auxiliary source (mp3 player, smartphone,
etc).
3. Press FM/AUX to listen to auxiliary source. The AUX
indicator on the front will turn on. Press FM/AUX
again to switch back to listen to the radio, or press
OFF to turn off audio playback.
Press BRIGHTNESS to switch between Hi (high) or Lo (low)
to adjust the brightness of the display.
Use the USB charging port to charge your smartphone or to
power USB powered devices such as a USB type lamp or fan.
your cell
phone
USB cable (not
included)
To connect your cell phone for charging:
Use a USB cable (not included) to connect your cell phone
to the USB connector of the unit. Your cell phone should
start charging.
In sleep mode, the audio playback will turn off
automatically after a specifi ed time (up to 2 hours).
1. Press SLEEP to activate the sleep countdown timer.
2. Press SLEEP repeatedly to cycle through the available
durations for Sleep Mode (90min, 80min, 70min ...
10min or OFF). The maximum time is 90 minutes.
3. To view remaining time in sleep mode, press and hold
SLEEP.
4. To cancel the sleep function, press OFF.
Sleep function
Auxiliary source
Brightness control
USB charging
Warranty information
12 Month Limited Warranty
Applies to RCA Clock Radios
VOXX Accessories Corporation (the Company) warrants to
the original retail purchaser of this product that should
this product or any part thereof, under normal use and
conditions, be proven defective in material or workmanship
within 12 months from the date of original purchase, such
defect(s) will be repaired or replaced with reconditioned
product (at the Company’s option) without charge for parts
and repair labor.
To obtain repair or replacement within the terms of this
Warranty, the product is to be delivered with proof of
warranty coverage (e.g. dated bill of sale), specifi cation of
defect(s), transportation prepaid, to the Company at the
address shown below.
This Warranty does not extend to the elimination of
externally generated static or noise, to correction of antenna
problems, loss/interruptions of broafast or internet service,
to costs incurred for installation, removal or reinstallation of
product, to corruptions caused by computer viruses, spyware
or other malware, to loss of media, fi les, data or content,
or to damage to tapes, discs, removable memory devices or
cards, speakers, accessories, computers, computer peripherals,
other media players, home networks or vehicle electrical
systems.
This Warranty does not apply to any product or part thereof
which, in the opinion of the Company, has suffered or
been damaged through alteration, improper installation,
mishandling, misuse, neglect, accident, or by removal or
defacement of the factory serial number/bar code label(s).
THE EXTENT OF THE COMPANY’S LIABILITY UNDER THIS
WARRANTY IS LIMITED TO THE REPAIR OR REPLACEMENT
PROVIDED ABOVE AND, IN NO EVENT, SHALL THE
COMPANY’S LIABILITY EXCEED THE PURCHASE PRICE PAID BY
PURCHASER FOR THE PRODUCT.
This Warranty is in lieu of all other express warranties or
liabilities. ANY IMPLIED WARRANTIES, INCLUDING ANY
IMPLIED WARRANTY OF MERCHANTABILITY, SHALL BE
LIMITED TO THE DURATION OF THIS WRITTEN WARRANTY.
ANY ACTION FOR BREACH OF ANY WARRANTY HEREUNDER
INCLUDING ANY IMPLIED WARRANTY OF MERCHANTABILITY
MUST BE BROUGHT WITHIN A PERIOD OF 24 MONTHS
FROM DATE OF ORIGINAL PURCHASE. IN NO CASE SHALL
THE COMPANY BE LIABLE FOR ANY CONSEQUENTIAL OR
INCIDENTAL DAMAGES FOR BREACH OF THIS OR ANY OTHER
WARRANTY. No person or representative is authorized to
assume for the Company any liability other than expressed
herein in connection with the sale of this product.
Some states do not allow limitations on how long an implied
warranty lasts or the exclusion or limitation of incidental or
consequential damage so the above limitations or exclusions
may not apply to you. This Warranty gives you specifi c legal
rights and you may also have other rights which vary from
state to state.
Recommendations before returning your product for a
warranty claim:
• Properly pack your unit. Include any remotes, memory
cards, cables, etc. which were originally provided with
the product. However DO NOT return any removable
batteries, even if batteries were included with the
original purchase. We recommend using the original
carton and packing materials. Ship to the address shown
below.
• Note that product will be returned with factory default
settings. Consumer will be responsible to restore any
personal preference settings.
Voxx Return Center,
c/o Genco ATC,
700 Commerce Parkway West Drive,
Suite C,
Greenwood, IN 46143
1-800-645-4994
For Canada Customers, please ship to:
Voxx Return Centre
c/o Genco
6685 Kennedy Road,
Unit#3, Door 14,
Mississuaga, Ontario
L5T 3A5
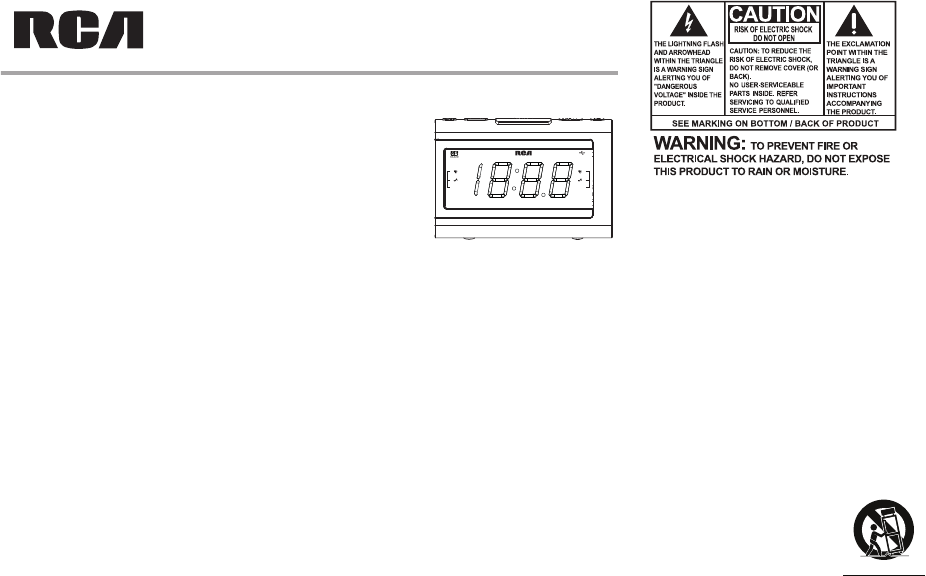
IMPORTANT SAFETY INSTRUCTIONS
PLEASE READ AND SAVE THIS FOR FUTURE REFERENCE
Some of the following information may not apply to your
particular product; however, as with any electronic product,
precautions should be observed during handling and use.
• Read these instructions.
• Keep these instructions.
• Heed all warnings.
• Follow all instructions.
• Do not use this apparatus near water.
• Clean only with dry cloth.
• Do not block any ventilation openings. Install in
accordance with the manufacturer’s instructions.
• Do not install near any heat sources such as radiators,
heat registers, stoves, or other apparatus (including
amplifi ers) that produce heat.
• Do not defeat the safety purpose of the polarized or
grounding-type plug. A polarized plug has two blades
with one wider than the other. A grounding type plug
has two blades and a third grounding prong. The wide
blade or the third prong is provided for your safety. If
the provided plug does not fi t into your outlet, consult
an electrician for replacement of the obsolete outlet.
• Protect the power cord from being walked on or
pinched particularly at plugs, convenience receptacles,
and the point where they exit from the apparatus.
• Only use attachments/accessories specifi ed by the
manufacturer.
• Use only with the cart, stand,
tripod, bracket, or table specifi ed
by the manufacturer, or sold with
the apparatus. When a cart is used,
use caution when moving the cart/
apparatus combination to avoid
injury from tip-over.
• Unplug this apparatus during lightning storms or when
unused for long periods of time.
• Refer all servicing to qualifi ed service personnel.
Servicing is required when the apparatus has been
damaged in any way, such as power-supply cord or
plug is damaged, liquid has been spilled or objects
have fallen into the apparatus, the apparatus has been
exposed to rain or moisture, does not operate normally,
or has been dropped.
ADDITIONAL SAFETY INFORMATION
• The AC/DC adapter supplied with this product is
intended to be correctly oriented in a vertical or fl oor
mount position.
• Do not use unauthorized chargers or power adapters.
Use only chargers or power adapters that came with
your product or that is listed in the user’s guide.
• Apparatus shall not be exposed to dripping or splashing
and no objects fi lled with liquids, such as vases, shall be
placed on the apparatus.
• Always leave suffi cient space around the product for
ventilation. Do not place product in or on a bed, rug,
in a bookcase or cabinet that may prevent air fl ow
through vent openings.
• Do not place lighted candles, cigarettes, cigars, etc. on
the product.
• Care should be taken so that objects do not fall into the
product.
• Do not attempt to disassemble the cabinet. This product
does not contain customer serviceable components.
• The marking information is located at the bottom of
apparatus.
• To be completely disconnect the power input, the AC/
DC adaptor of apparatus shall be disconnected from the
mains.
• AC/DC adaptor is a disconnect device. The AC/DC
adaptor should not be obstructed OR should be easily
accessed during intended use.
• The ventilation should not be impeded by covering
the ventilation openings with items such as newspaper,
table-cloths, curtains etc.
• No naked fl ame sources such as lighted candled should
be placed on the apparatus.
• Attention should be drawn to the environmental aspects
of battery disposal.
• The use of apparatus in moderate climates.
Important battery precautions
• Any battery may present a risk of fi re, explosion, or
chemical burn if abused. Do not try to charge a battery
that is not intended to be recharged, do not incinerate,
and do not puncture.
• Non-rechargeable batteries, such as alkaline batteries,
may leak if left in your product for a long period of
time. Remove the batteries from the product if you
are not going to use it for a month or more.
• If your product uses more than one battery, do not
mix types and make sure they are inserted correctly.
Mixing types or inserting incorrectly may cause them
to leak.
• Discard any leaky or deformed battery immediately.
They may cause skin burns or other personal injury.
• Please help to protect the environment by recycling or
disposing of batteries according to federal, state, and
local regulations.
WARNING: The battery (battery or batteries or battery
pack) shall not be exposed to excessive heat such as
sunshine, fi re or the like.
Ecology
Help protect the environment - we recommend that you
dispose of used batteries by putting them into specially
designed receptacles.
Electrical power information
AC/DC Adaptor:
Input: 100 - 240 V ~ AC 50/60 Hz
Output: 5.0 V---DC 1.2A
Note: This equipment has been tested and found to comply
with the limits for a Class B digital device, pursuant to
Part 15 of FCC Rules. These limits are designed to provide
reasonable protection against harmful interference in a
residential installation. This equipment generates, uses, and
can radiate radio frequency energy and, if not installed and
used in accordance with the instructions, may cause harmful
interference to radio communications.
However, there is no guarantee that interference will not
occur in a particular installation. If this equipment does
cause harmful interference to radio or television reception,
which can be determined by turning the equipment off and
on, the user is encouraged to try to correct the interference
by one or more of the following measures:
• Reorient or relocate the receiving antenna.
• Increase the separation between the equipment and
receiver.
]
Portable Cart Warning
FCC Information
FCC Information
English
Beep
Alarm 1
USB CHARGING CLOCK RADIO
Alarm 2
Beep
Music
Aux
Sleep
PM
FM
3. Press Set Alarm 1/ Set Alarm 2 again to save the time
setting.
4. Press Set Alarm 1/ Set Alarm 2 repeatedly to select
your choice of alarm source (Beep / Music / Off).
The corresponding alarm setting icon will light when
alarm is set to activate.
Wake to alarm
The unit is equipped with GRAD-U-WAKE. The alarm volume
will increase gradually to its maximum in about 30 to 45
seconds.
Ways to turn off alarm
• To silence the alarm function momentarily, press
SNOOZE. The alarm or radio will activate again
when the snooze period (9 minutes) is over. (see
SmartSnooze
TM
section for more info)
• To turn off the alarm, press OFF. The alarm will activate
again the next day.
• To disable the alarm function completely, press Set
Alarm 1/ Set Alarm 2 repeatedly until no alarm mode
icon shows on the display.
RC142
Alkaline (1.5V) battery is recommended.
Carbon-zinc battery may be used but
memory holding time will be substantially
reduced. Memory holding time for a fresh
alkaline battery is approximately 8 hours (if alarm
is not operated) which should take care of short,
nuisance-type AC power failures. To preserve battery
life, the unit should remain plugged into an AC
outlet. As the battery gets older, its voltage drops and
memory may be lost. Be sure to replace the battery
periodically. Battery should be removed if the unit will
be stored for more than one month. A leaky battery
can badly damage the clock radio.
Charging function may not be supported for
all phones or electronic devices.
If wake to Music is selected, the alarm will
playback the last tuned radio station when it
goes off.
• Connect the equipment into an outlet on a circuit
different from that to which the receiver is connected.
• Consult the dealer or an experienced radio/TV technician
for help.
Changes or modifi cations not expressly approved by VOXX
Accessories Corporation could void the user’s authority to
operate the equipment.
Industry Canada Regulatory Information
CAN ICES-3 (B)/NMB-3 (B)
Avis d’Industrie Canada
CAN ICES-3 (B)/NMB-3 (B)
Power failure indicator
If you have not installed the two AA batteries in the product,
or the batteries run out while AC/DC adaptor is disconnected,
all the settings (clock and alarm) will be lost. After AC/
DC adaptor is reconnected, the Digital Display will fl ash to
indicate that power was interrupted and you should readjust
the time settings.
General controls
Español
Alguna de la siguiente información quizá no se aplique a
su producto en particular. Sin embargo, como con cualquier
producto electrónico, se deben tomar precauciones durante
su manejo y uso.
• Lea estas instrucciones.
• Conserve estas instrucciones.
• Tome en cuenta todas las advertencias.
• Siga todas las instrucciones.
• No use este aparato cerca del agua.
• Limpie solamente con un paño seco.
• No bloquee ninguna de las aperturas de ventilación.
Instale de acuerdo con las instrucciones del fabricante.
• No instale cerca de fuentes de calor tales como
radiadores, registros de calor, estufas, u otros aparatos
(incluyendo amplifi cadores) que produzcan calor.
• No elimine el propósito de seguridad de la clavija
polarizada o del tipo a tierra. Una clavija polarizada
tiene dos cuchillas, una más ancha que la otra. Una
clavija del tipo a tierra tiene dos cuchillas y una tercera
punta para conexión a tierra. La cuchilla ancha o la
tercera punta son suministradas para su seguridad. Si la
clavija suministrada no se adapta dentro de su toma de
corriente, consulte a un electricista para que reemplace
la toma de corriente obsoleta.
• Proteja el cable de corriente de pisotones o machucones
particularmente en las clavijas, receptáculos de
conveniencia, y en punto donde
salen del aparato.
• Use solamente accesorios/
aditamentos especifi cados por el
fabricante.
• Use solamente con el carro,
soporte, trípode, consola, o mesa
especifi cados por el fabricante,
o vendidos con el aparato.
Cuando se utiliza un carro, tenga precaución al mover
la combinación de carro/aparato para evitar lesión
ocasionada por volcadura.
• Desconecte este aparato durante tormentas eléctricas o
cuando no sea utilizado por largos períodos de tiempo.
• Refi era todo el servicio a personal de servicio califi cado.
El servicio es requerido cuando el aparato ha sido
dañado de alguna forma, tal como daño a la clavija o
al cable de corriente, cuando se ha derramado líquido
o han caído objetos dentro del aparato, el aparato
ha sido expuesto a lluvia o humedad, no funciona
normalmente, o ha sido tirado.
INFORMACION ADICIONAL DE SEGURIDAD
• El adaptador CA/CD suministrado con este producto está
diseñado para estar orientado correctamente en una
posición de montaje sobre el piso o vertical.
• No use cargadores o adaptadores de corriente no
autorizados. Sólo utilice cargadores o adaptadores de
corriente que vengan con su producto o que estén
listados en la guía del usuario.
• El aparato no debe quedar expuesto a goteos o
salpicaduras de líquidos, y, por lo tanto, no se deben
colocar sobre el aparato objetos que contengan líquidos,
como por ejemplo vasos.
• Siempre deje sufi ciente espacio para ventilación
alreadedor del producto. No ponga el producto en la
cama, alfombra, librero o gabinete que pueda obstruir
la corriente de aire a través de apeturas de ventilación.
• No pongan velas, cigarillos o cigarros encendidos encima
de producto.
• Tome precauciones para evitar que caigan objetos
dentro del producto.
• No intente desensamblar el gabinete. Este producto no
contiene componentes que requieran servicio por parte
del cliente.
• La información de señalamiento está ubicada en la
parte inferior del aparato.
• Para desconectar completamente de la entrada de
corriente, el adaptador CA/CD del aparato deberá
desconectarse de la toma de corriente.
• El adaptador CA/CD es un dispositivo de desconexión. el
adaptador CA/CD no deberá bloquearse o debería tener
acceso fácilmente para el uso para el que fue diseñado.
• No se deberá obstruir la ventilación cubriendo las
aperturas de ventilación con elementos tales como
periódicos, paños, cortinas, etcétera.
• Ninguna fuente de fl ama abierta, tal como velas
encendidas, deberá colocarse sobre el aparato.
• Se deberá poner atención a los aspectos ambientales al
eliminar las baterías.
• El uso del aparato en climas moderados.
Precauciones importantes para la batería
• Cualquier batería puede presentar un riesgo de fuego,
explosión o quemadura química si es mal tratada. No
trate de cargar una batería que no esté diseñada para
ser recargada, no incinere y no perfore.
• Baterías no recargables, tales como las baterías alcalinas,
pueden tener fugas si son dejadas en su producto por
un largo periodo de tiempo. Retire las baterías del
producto si usted no lo va a usar por un mes o más.
• Si su producto usa más de una batería, no mezcle tipos
y asegúrese de que estén insertadas correctamente.
Mezclar tipos de baterías o insertarlas incorrectamente
puede causar que tengan fugas.
• Deseche inmediatamente cualquier batería con fugas o
deformada. Ellas pueden causar quemaduras de la piel u
otra lesión personal.
• Por favor ayude a proteger el ambiente reciclando
o eliminando las baterías de conformidad con las
regulaciones federales, estatales y locales.
ADVERTENCIA: La batería (batería o baterías o paquete de
baterías) no deberá ser expuesta a calor excesivo tal como el
sol, fuego o similares.
Medio ambiente
Ayude a cuidar el medio ambiente. Le recomendamos
que deseche las baterías gastadas en los contenedores
especialmente diseñados para ello.
Información de Potencia Eléctrica
Adaptador CA/CD:
Entrada: 100 - 240 V ~ CA 50/60 Hz
Salida: 5.0 V---CD 1.2A
Nota: Se probó este equipo y podemos afi rmar que cumple
con las restricciones establecidas para un dispositivo digital
Clase B, de acuerdo con la Sección 15 de la Reglamentación
de FCC. Estas restricciones fueron designadas para brindar
una protección razonable frente a la interferencia perjudicial
en una instalación residencial. Este equipo genera, usa
y puede irradiar energía de radiofrecuencia y, si no está
instalado o no se lo utiliza de acuerdo con las instrucciones,
puede ocasionar interferencias perjudiciales para las
comunicaciones de radio.
Sin embargo, no existe ninguna garantía de que no se vaya
a producir una interferencia en una instalación particular.
Si este equipo produce una interferencia perjudicial con
Información FCC
Información FCC
]
Advertencia sobre el
Carro Portátil
la recepción de la radio o la televisión, lo cual podría
determinarse apagando y encendiendo el equipo, se le pide
al usuario que intente corregir la interferencia siguiendo
una o varias de las siguientes medidas.
• Reoriente o reubique la antena receptora
• Aumente la separación entre el equipo y el receptor
• Conecte el equipo a un toma corriente diferente al que
conecta el receptor
• Consulte al distribuidor o a un técnico especializado en
radio / TV para solicitar ayuda
Los cambios o modifi caciones que no sean expresamente
aprobados por VOXX Accessories Corporation podrían
invalidar la autoridad del usuario para hacer funcionar el
aparato.
Información Regulatoria de la Industria Canadiense
CAN ICES-3 (B)/NMB-3 (B)
Back view
USB – To charge your cell phone or other USB powered
electronic devices
DC IN – Plug in for power
Top view
SLEEP – Activate sleep function.
RECALL/Set Time/Store Preset – Press to recall a stored
radio station. Press and hold to set time. When the radio is
on, press and hold to store the current radio station.
VOL -/ Set Alarm 1 – Press to toggle alarm 1 wake mode
(beep, radio, or off). Press and hold to set alarm 1. When
FM or AUX is on, press to decrease volume.
VOL +/ Set Alarm 2 – Press to toggle alarm 2 wake mode
(beep, radio, or off). Press and hold to set alarm 2. When
FM or AUX is on, press to increase volume.
ON/FM/AUX – Turn audio playback on. Select FM or AUX
mode.
TUNE - / HOUR + – Adjust radio frequency and clock time.
SNOOZE/BRIGHTNESS – Turn off the wake function
momentarily (9 minutes); turn off the current sleep timer.
Select display brightness (Hi or Lo).
TUNE + / MINUTE + – Adjust radio frequency and clock
time.
OFF – Turn FM or AUX audio off. Turn off the alarm.
Vista superior
SLEEP – Activa la función dormir.
RECALL/Set Time/Store Preset – Presione para recuperar
una estación de radio almacenada. Presione y mantenga
presionado para establecer la hora. Cuando el radio esté
encendido, presione y mantenga presionado para guardar
la estación de radio actual.
VOL -/ Set Alarm 1 – Presione para alternar modo
despertar alarma 1 (bip, radio, u off). Presione y mantenga
presionado para establecer alarma 1. Cuando FM o AUX
esté activo, presione para disminuir el volumen.
VOL +/ Set Alarm 2 – Presione para alternar modo
despertar alarma 2 (bip, radio, u off). Presione y mantenga
presionado para establecer alarma 2. Cuando FM o AUX
esté activo, presione para subir el volumen.
ON/FM/AUX – Activa la reproducción de audio. Seleccione
modo FM o AUX.
TUNE - / HOUR + – Ajusta la frecuencia de radio y la hora
del reloj.
SNOOZE/BRIGHTNESS – Apaga momentáneamente la
función despertar (9 minutos); apaga el temporizador de
dormir actual. Selecciona brillo de la pantalla (Alto o Bajo).
TUNE + / MINUTE + – Ajusta la frecuencia de radio y la
hora del reloj.
OFF – Apaga el audio FM o AUX. Apaga la alarma.
Set Time / Store Preset
ON
OFF
SLEEP VOL VOLRECALL
ALARM MODE
BEEP / MUSIC / OFF
FM/AUX MINUTEHOUR
Press and hold Set Alarm 1 Set Alarm 2
SNOOZE
BRIGHTNESS
TUNE TUNE
Set Time / Store Preset
ON
OFF
SLEEP VOL VOLRECALL
ALARM MODE
BEEP / MUSIC / OFF
FM/AUX MINUTEHOUR
Press and hold Set Alarm 1 Set Alarm 2
SNOOZE
BRIGHTNESS
TUNE TUNE
Right view
AUX IN – Auxiliary input jack
Vista derecha
AUX IN – Receptáculo de entrada auxiliar
Using the Radio
Press the ON button to turn on the radio. Press the OFF
button to turn off the radio. To display the current station
that the radio is tuned to, press TUNE +/- quickly.
Press TUNE +/- to adjust the radio frequency with reference
to the tuning dial scale. Press and hold TUNE +/- for two
seconds to automatically search for the next available station.
The tuner will pause on each found station for one second
until the TUNE +/- is released and scanning is completed.
Switching Audio Source
Press FM/AUX to select between FM and auxiliary source.
Station presets
To store a station preset:
1. Tune to a radio station.
2. Press and hold Store Preset. Preset location P01P01
fl ashes on the display. Press VOL +/- to select desired
preset number, then press Store Preset again to save
the station to that preset. This unit can store up to 10
stations. Your presets are stored one by one from P01P01
to P10P10.
To recall a preset station:
1. In radio mode, press RECALL.
The current preset station number shows on the display.
2. Press RECALL repeatedly to select a desired preset
station.
Built-in AFC
The Built In Automatic Frequency Control (AFC) helps to
reduce drift on FM reception and keeps the radio locked in
on the FM station to which it is tuned.
This unit is equipped with an FM antenna at the back. Uncoil
the antenna to its full length for best reception. Tape the
end of the antenna onto the wall if possible to improve
reception.
Antes de comenzar
Conexión a la corriente
• Conecte el adaptador de corriente suministrado al
receptáculo de corriente de la unidad, y conecte el otro
extremo a una toma de pared adecuada.
• Una vez conectado a la corriente, el Reloj parpadea.
Consulte la sección Reloj para instrucciones sobre la
confi guración apropiada del Reloj.
Cooperación respaldo de batería
• Este radio reloj está equipado con un sistema de
mantenimiento del tiempo que puede recibir energía
de dos baterías tamaño AA (no incluidas). El circuito de
protección por fallas de energía no funcionará a menos
que las baterías estén instaladas.
• Cuando la corriente doméstica normal sea interrumpida
o el adaptador CA/CD esté desconectado, las baterías
darán energía al radio reloj para mantener el
seguimiento de las confi guraciones de tiempo y alarma
programadas en memoria.
• Cuando el respaldo de baterías funcione, la pantalla
digital no se iluminará, sin embargo, la alarma todavía
sonará durante la interrupción de energía si la potencia
de baterías remanente es sufi ciente.
• La operación normal se reanudará después de que la
corriente CA sea restaurada de manera que usted no
tendrá que restablecer la alarma o la hora.
Controles generales
Antes de comenzar
Se recomiendan baterías alcalinas (1.5 V).
Se pueden usar baterías de carbon-zinc
pero el tiempo de retención de memoria
se reducirá sustancialmente. El tiempo de
retención de memoria para unas baterías alcalinas
nuevas es de aproximadamente 8 horas (si la alarma
no es operada) lo cual debería ser sufi ciente para
esas molestas interrupciones de la corriente CA de
corta duración. Para preservar la vida de las baterías,
la unidad deberá permanecer conectada a una toma
de corriente CA. Conforme pase el tiempo de vida
útil de la batería, su voltaje cae y la memoria puede
perderse. Asegúrese de reemplazar periódicamente
las baterías. Las baterías deberán renovarse si la
unidad va a ser almacenada por más de un mes.
Unas baterías con fugas pueden dañar seriamente el
radio reloj.
Vista posterior
USB – Para cargar su teléfono celular u otros dispositivos
electrónicos alimentados vía USB
DC IN – Se conecta a la corriente eléctrica
Para instalar las baterías:
1. Remueva la puerta del compartimiento de baterías
(ubicada en la parte inferior del radio) aplicando
presión del dedo a la lengüeta en la puerta de las
baterías y luego levante la puerta hacia afuera del
gabinete.
2. Conecte dos baterías tamaño AA (no incluido) en la
clavija del conector.
3. Vuelva a colocar la puerta del compartimiento.
Indicador de falla de corriente
Si usted no ha instalado las dos baterías AA en el producto,
o si las baterías se agotaron mientras el adaptador CA/
CD estaba desconectado, todas las confi guraciones (reloj
y alarma) se perderán. Después de que el adaptador CA/
CD vuelva a conectarse, la pantalla digital parpadeará para
indicar que hubo interrupción en la corriente y usted deberá
volver a ajustar la hora.


Find Your Products By Category
Please Login
