
5.0
Owner's of the West Bend Time Clock 40005X gave it a score of 5.0 out of 5. Here's how the scores stacked up:

2010 West Bend
®
, a Brand of Focus Electrics, LLC.
www.focuselectrics.com
To prevent personal injury, NEVER place the
battery in mouth for ANY reason, as it small and
can be swallowed.
DISCARD USED BATTERY IMMEDIATELY. KEEP
BATTERY AWAY FROM CHILDREN.
For household use ONLY.
Battery Installation
1. Press down on the clip to expose the battery
compartment cover. Slide the battery compartment
cover off and insert one triple A (AAA) battery. Be
sure to match the plus (+) and minus (-) symbols.
2. Replace the battery compartment cover, peel
the static label from the electronic display and your
timer is now ready to use.
Note: The timer will count up to or down from
99 hours, 99 minutes, and 99 seconds. Keep the
timer away from all heat sources. Temperatures
above 120° F, 50° C, can damage the timer. Never
immerse the timer in water or any other liquid.
3. The clip on the back can be attached to any thin
surface or belt or can be used with the metal stand
bar to stand on any flat surface. The magnet will
also secure it to any magnetic surface. Place a
lanyard through the hole to hang.
Timer Operation
1. To set the desired time, press “STOP/RESET”
to zero the display.
2. Press the number buttons, 0-9, to program the
correct hours, minutes, and seconds. For example,
to program 2 hours and 30 minutes, you would
press “02 30 00.”
3. Press the “START” button to begin timing.
4. When time expires, a distinctive alarm will
sound. The alarm will silence after 1 minute.
5. Press any button to silence the alarm, then
“STOP/RESET” to stop the timer.
Operate Stopwatch
1. Press “STOP/RESET” to zero the display.
2. Press “START” to time.
3. To pause the stopwatch, press “STOP/RESET”
once to pause, then press “START” to resume
timing.
4. To clear the stopwatch display, press
“STOP/RESET” to stop timing, then press again to
clear the display.
Care and Cleaning
1. Wipe the exterior of the timer with a soft, damp
cloth if necessary.
Appliance 1 Year Limited Warranty
Focus Electrics, LLC (“Focus Electrics”) warrants
this appliance from failures in the material and
workmanship for one (1) year from the date of
original purchase with proof of purchase, provided
the appliance is operated and maintained in
conformity with the provided Instruction Manual.
Any failed part of the appliance will be repaired or
replaced without charge at Focus Electrics’
discretion. This warranty applies to indoor
household use only.
This warranty does not cover any batteries. This
warranty is null and void, as determined solely by
Focus Electrics if the appliance is damaged
through accident, misuse, abuse, negligence,
scratching, or if the appliance is altered in any way.
THIS WARRANTY IS IN LIEU OF ALL IMPLIED
WARRANTIES, INCLUDING WARRANTIES OF
MERCHANTABILITY, FITNESS FOR A
PARTICULAR PURPOSE, PERFORMANCE, OR
OTHERWISE, WHICH ARE HEREBY EXCLUDED.
IN NO EVENT SHALL FOCUS ELECTRICS BE
LIABLE FOR ANY DAMAGES, WHETHER
DIRECT, INDIRECT, INCIDENTAL,
FORSEEABLE, CONSEQUENTIAL, OR SPECIAL
ARISING OUT OF OR IN CONNECTION WITH
THIS APPLIANCE.
If you think the appliance has failed or requires
service within its warranty period, please contact
the Focus Electrics Customer Service Department
at (866) 290-1851, or e-mail us at
service@focuselectrics.com
. A receipt proving the
original purchase date will be required for all
warranty claims, hand written receipts are not
accepted. You may also be required to return the
appliance for inspection and evaluation. Return
shipping costs are not refundable. Focus Electrics
is not responsible for items lost in transit.
Valid ONLY in the USA and Canada.
Visit our Web site at www.focuselectrics.com
Focus Electrics, LLC
Attn: Customer Service
P.O. Box 2780
West Bend, WI. 53095
Afin d’éviter toute blessure, le placez JAMAIS la
pile dans la bouche QUEL QU’EN SOIT le motif
car elle est petite et elle risquerait d’être ingérée.
JETEZ TOUTE PILE USAGÉE IMMÉDIATEMENT.
CONSERVEZ VOTRE PILE HORS DE PORTÉE DES
ENFANTS.
Pour une utilisation domestique
UNIQUEMENT.
Installation de la pile
1. Appuyez sur la pince pour exposer le cache du
logement de la pile. Faites glisser le cache de la
pile pour le retirer et insérez une pile triple A
(AAA). Assurez-vous de faire correspondre les
symboles plus (+) et moins (-).
2. Remettez en place le cache de la pile, détachez
l’étiquette statique de l’affichage électronique et
votre minuteur est maintenant prêt à l’emploi.
Remarque : Le minuteur va chronométrer ou
décompter à partir de 99 heures, 59 minutes et
59 secondes. Veuillez conserver le minuteur à
l’écart de toutes les sources de chaleur. Des
températures supérieures à 120° F, 50° C,
peuvent détériorer le minuteur. Ne plongez
jamais le minuteur dans de l’eau ou dans tout
autre liquide.
3. La pince à l’arrière peut être fixée sur toute
surface fine ou sur toute ceinture ou elle peut
être utilisée avec la barre de support métallique
pour tenir debout sur toute surface plane.
L’aimant permettra également de le fixer contre
toute surface magnétique. Placez un cordon
dans le trou pour pouvoir le suspendre autour
du cou.
Utilisation du Minuteur
1. Pour régler le temps souhaité, appuyez sur
« STOP/RESET » (arrêt/réinitalisation) pour
mettre l’écran à zéro.
SAVE THIS INSTRUCTION MANUAL FOR
FUTURE REFERENCE.
OPERATING PRECAUTIONS
PRODUCT WARRANTY
CONSERVEZ CE MODE D’EMPLOI POUR UNE
CONSULTATION ULTÉRIEURE.
PRÉCAUTIONS DE SÉCURITÉ
ELECTRONIC TIMER
Instruction Manual
Register this product at www.registerfocus.com.
M
INUTEUR
É
LECTRONIQUE
Mode d’emploi
Enregistrez ce produit sur notre site Internet :
www.registerfocus.com
40005X 40005X
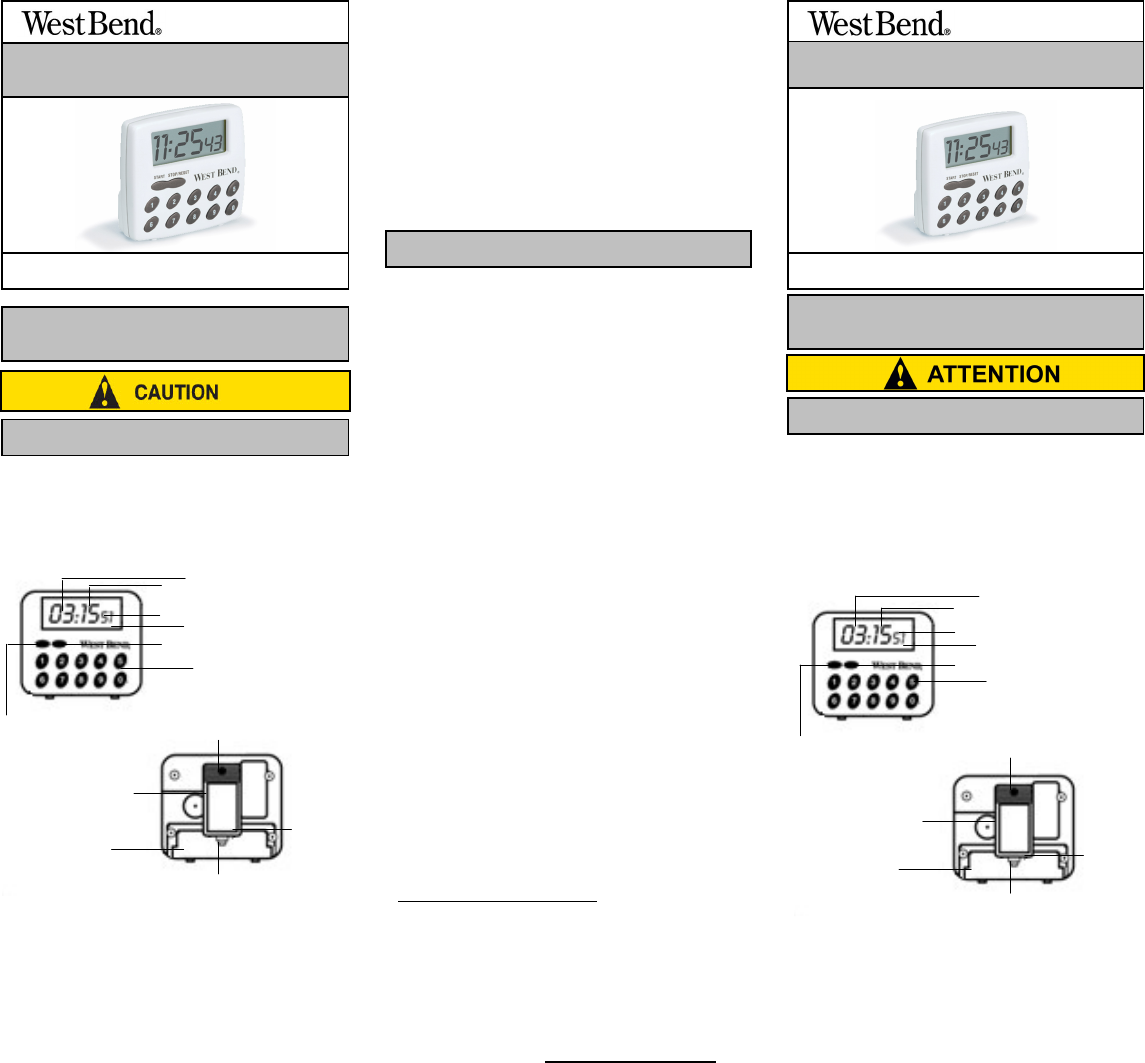
Heures
Minutes
Secondes
Écran LCD
Touche Numériques
Touche Arrêt /réinitialisation
Touche Marche
Trou de Suspension
Aimant
Cache du
Logement de la
Pile
Support
Pince
Hours
Minutes
Seconds
LCD Display
Number Buttons
Stop/Reset Button
Start Button
Hanging Hole
Magnet
Battery
Compartment
Stand
Clip


Find Your Products By Category
Please Login
