
0
Owner's of the Black & Decker Router Black & Decker Router gave it a score of 0 out of 5. Here's how the scores stacked up:

9
• Set the edge guide to the required distance.
• Tighten the fixing screws (16).
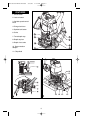
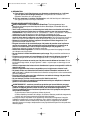
ATTACHING THE DUST EXTRACTION ADAPTOR (FIG. C)
WARNING: Turn the router off and disconnect it from the power supply.
The dust extraction adaptor allows you to connect a vacuum cleaner to the tool.
• Connect the hose (17) of the vacuum cleaner to the adaptor (10).
OPERATION
WARNING: To prevent personal injury, always disconnect plug from power source
before assembly, making adjustments or changing bits. Failure to do so could
result in accidental starting and possible injury.
WARNING: To reduce the risk of injury, do not overload the tool. Let it work at its
own pace.
• Carefully guide the cord in order to avoid accidentally cutting it.
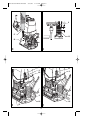
ADJUSTING THE DEPTH OF CUT (FIG. D, E & F)
WARNING: Turn the router off and disconnect it from the power supply.
The depth of cut is the distance (X in figure D) between the depth stop bar (8) and the
depth stop (18). The depth of cut can be set in two different ways as follows:
ADJUSTING THE DEPTH OF CUT USING THE SCALE (FIG. E)
WARNING: Turn the router off and disconnect it from the power supply.
• Install the router bit as described previously.
• Loosen the locking screw (19).
• Pull the plunge lock lever (4) up.
• Plunge the router down until the router bit touches the workpiece.
• Push the plunge lock lever (4) down.
• Move the pointer (20) in the zero position on the scale (9).
• Add the desired depth of cut to the starting position.
• Move the depth stop bar (8) to the calculated position on the scale.
• Tighten the locking screw (19).
• Fine adjust using the adjusting knob (21).
• Pull the plunge lock lever (4) up and let the router return to its original position.
• After switching the router on, plunge it down and make the desired cut.
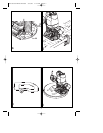
ADJUSTING THE DEPTH OF CUT USING A PIECE OF WOOD (FIG. F)
WARNING: Turn the router off and disconnect it from the power supply.
• Fit the router bit and plunge the router down as described above.
• Pull the depth stop bar (8) up.
• Place a piece of wood with a thickness equal to the desired depth of cut between the depth
stop (17) and the depth stop bar (8).
• Tighten the locking screw (19).
• Fine adjust using the adjusting knob (21).
• Remove the piece of wood.
• Pull the plunge lock lever (4) up and let the router return to its original position.
• After switching the router on, plunge it down and make the desired cut.
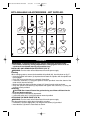
ADJUSTING THE TURRET DEPTH STOP (FIG. G)
WARNING: Turn the router off and disconnect it from the power supply.
After turning the turret depth stop to the desired setting, you can fine-adjust the depth stop
to be used. If you want to make several cuts with a different depth of cut, adjust each of the
depth stops.
• Turn the depth stop screw (22) up or down as required using a screwdriver.
ELECTRONIC SPEED CONTROL DIAL
The speed of your router is variable. Use the electronic speed control dial (3) to produce
uniform cutting results in wood, plastics and aluminum. Use the lower settings for large
diameter cutters and the higher settings for small diameter cutters.
492778-00 RP250 Router 2/6/06 1:13 PM Page 9


Find Your Products By Category
Please Login
