
0
Owner's of the RCA Radio Antenna ANT3038XR gave it a score of 0 out of 5. Here's how the scores stacked up:

6
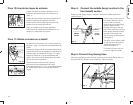
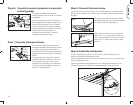
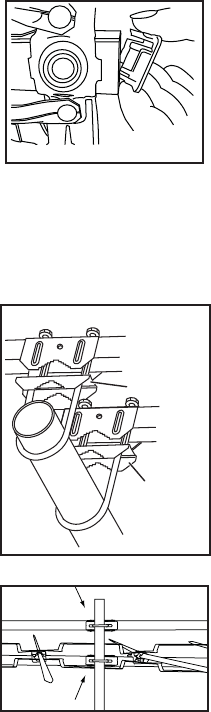
Step 11: Mount the antenna to a mast
Find the two U-bolts, four 1/4” fl ange nuts, and the
two mast clamp inserts.
Place the mast clamp inserts on the inside of the
mast clamps on the antennas as shown in fi gure
12. Then insert the U-bolts into the mast clamps
and mast clamp inserts. Attach the nuts loosely.
Slide the antenna over the mast and lightly tighten
the two mast clamps. (See fi gures 12 and 13.) The
top side of the antenna is the side with the black
plastic pieces on it.
Fig. 13
#10 Nuts
Clamp insert
Clamp
insert
Boom brace
Main
boom
Fig. 12
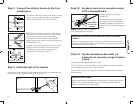
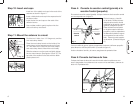
Step 10: Insert end caps
Insert two of the plastic end caps in the ends of the
antenna as shown in fi gure 11.
Insert a third plastic end cap in the exposed end of
the boom brace.
Insert the last two end caps on the ends of the
refl ector booms.
Use a rubber mallet to gently tap them into the
ends so that they are secure.
Fig. 11
11
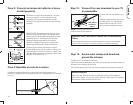
Paso 4: Conecte la sección central (grande) a la
sección frontal (pequeña)
Encuentre la sección central (grande). Ubique el extremo de la sección central
que corresponda con la fi gura 4.
Retire la tuerca y el tornillo
en el centro. Deslice el brazo
delgado de la sección frontal
(pequeña) en la sección central
(grande). Asegúrese que las
líneas de fase se encuentren
en la parte superior del brazo
pequeño y que los sujetadores
de elementos plásticos negros
se encuentren en este mismo
lado. Esta es la parte superior
de la antena. (Consulte la fi gura
5.)
Fig. 4
Sección
frontal
Sección
central
Líneas de fase
Fig. 5
Paso 5: Conecte las líneas de fase
Coloque las líneas de fase de la sección frontal sobre los prisioneros con
rosca. Asegúrelas a los prisioneros con rosca con las arandelas y tuercas de
brida #10. Apriételas bien.
Español
Con un martillo de goma, golpee suavemente el extremo del brazo pequeño
para alinear los orifi cios para tornillo. (Consulte la fi gura 4.)
Vuelva a instalar el tornillo y la tuerca; asegúrese de apretarlos bien.


Find Your Products By Category
Please Login
