
0
Owner's of the DeWalt Cordless Saw DeWalt Compact Reciprocating Saw gave it a score of 0 out of 5. Here's how the scores stacked up:
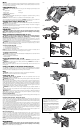


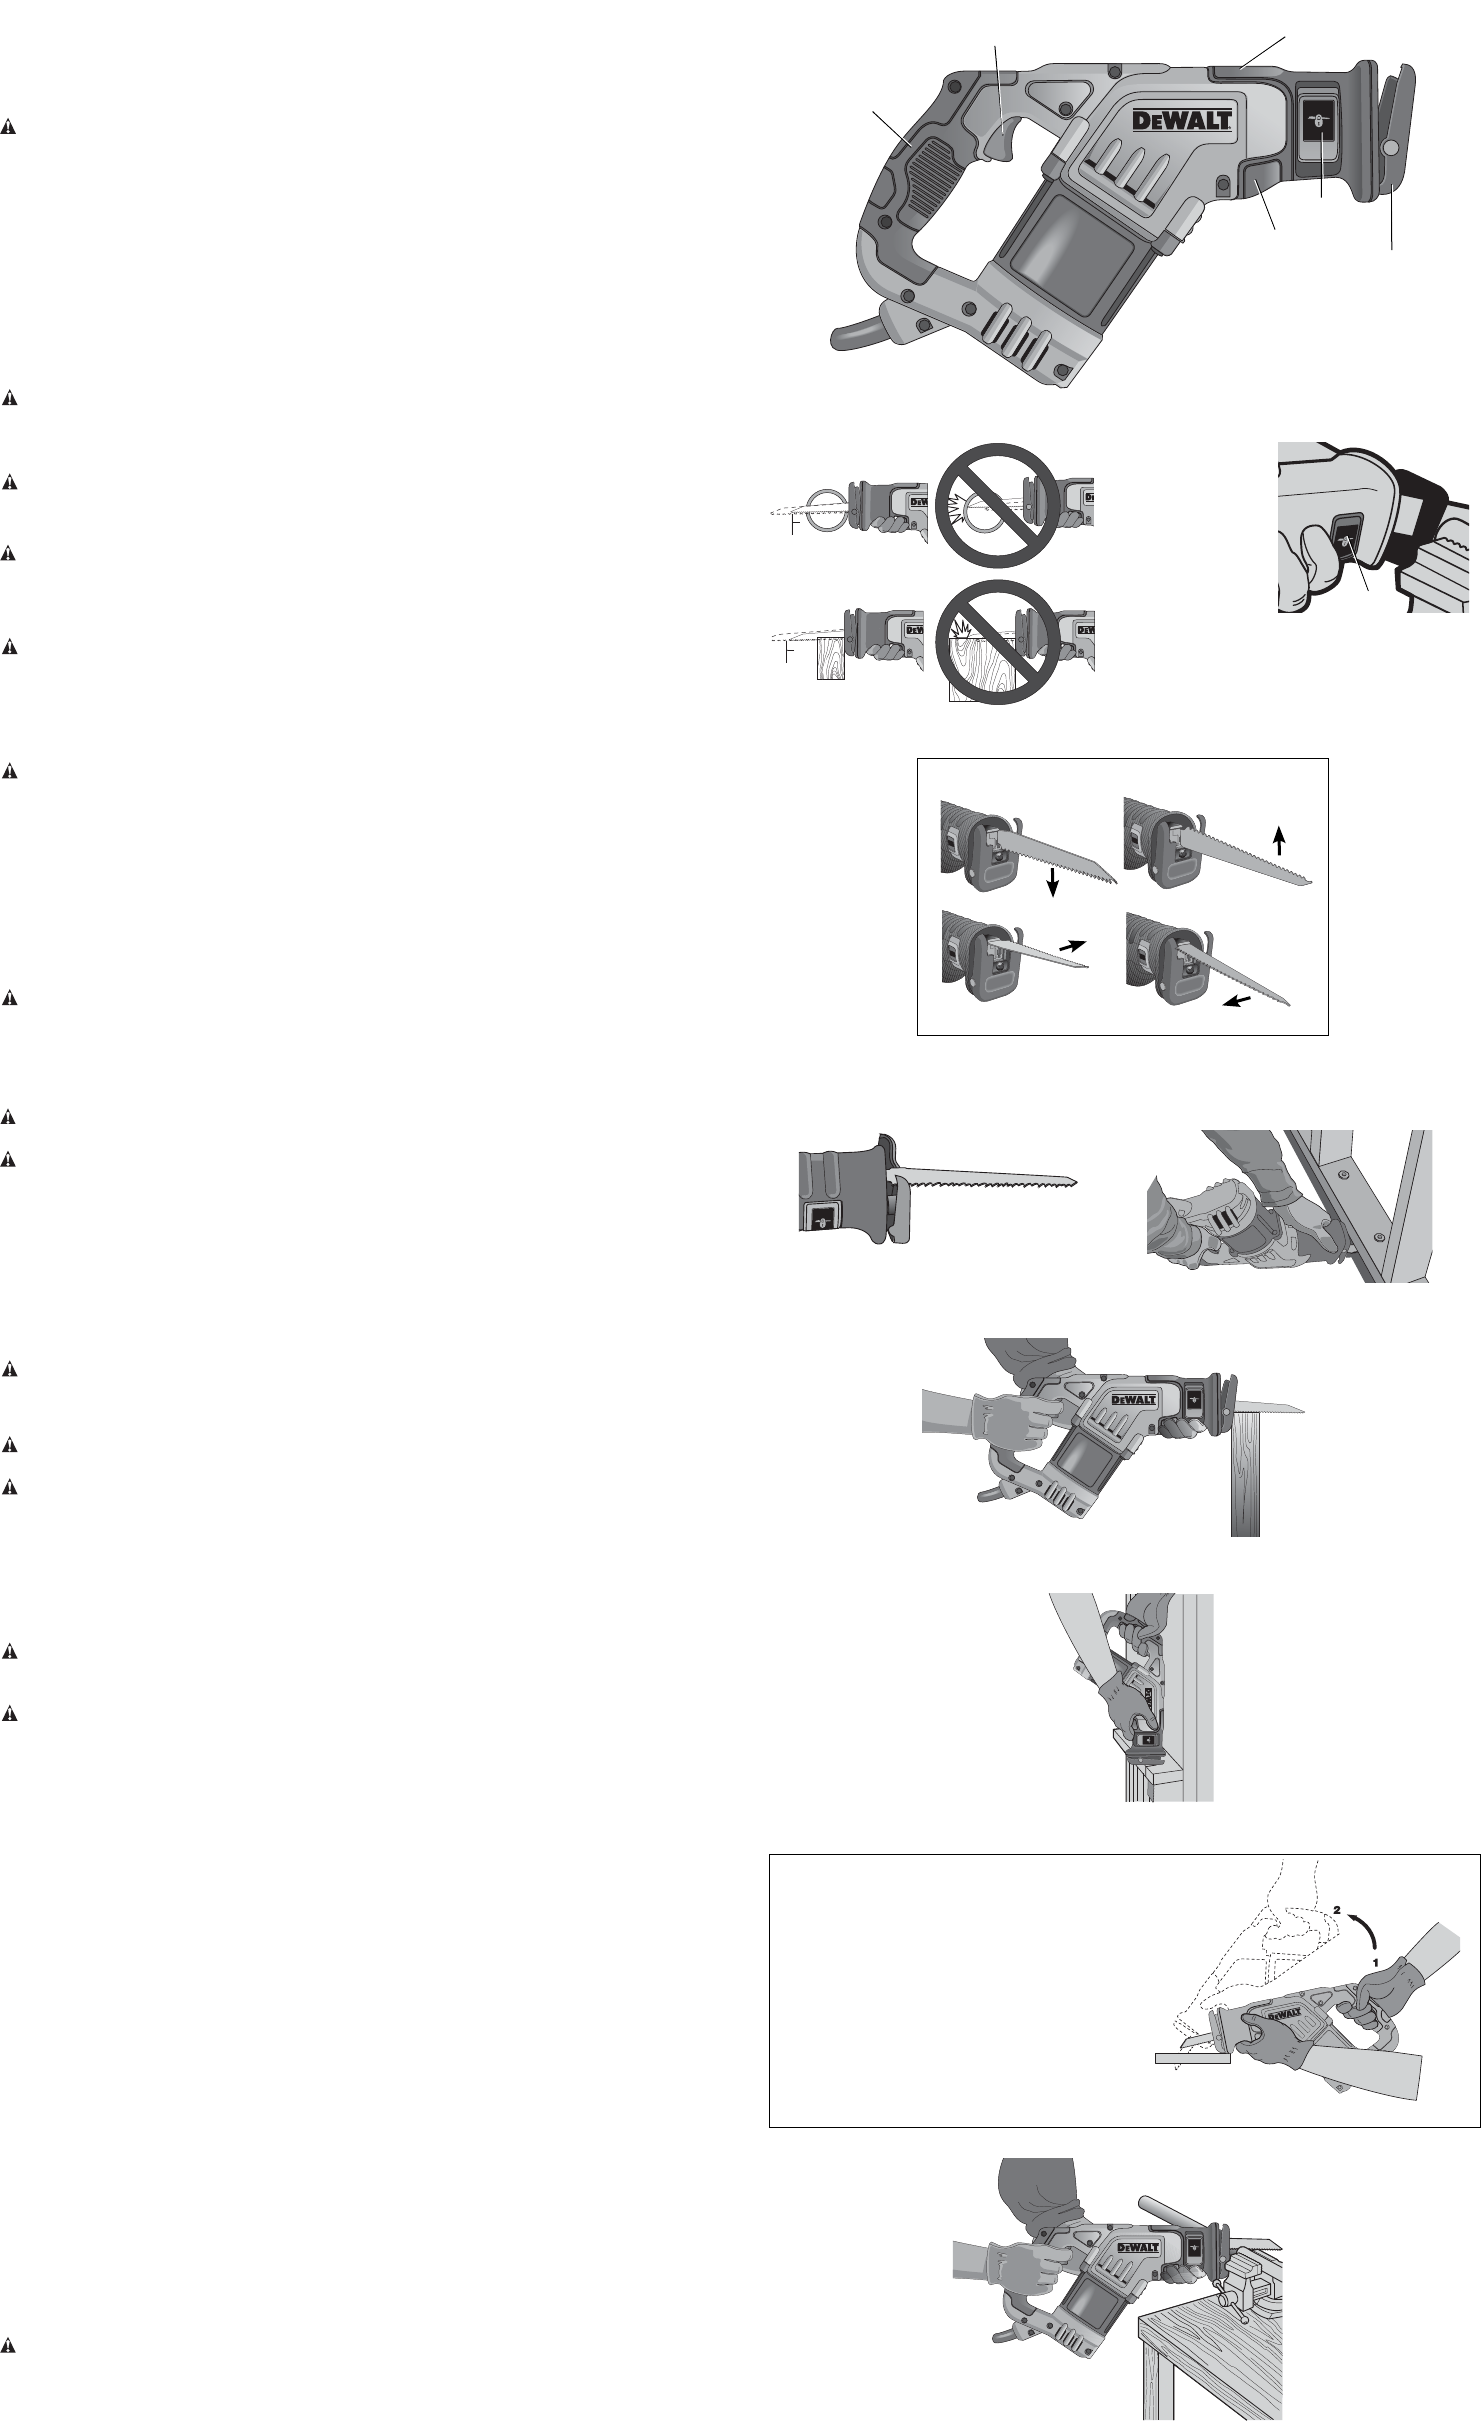
FIG 5
Motor
Be sure your power supply agrees with the nameplate marking. Voltage decrease of more than
10% will cause loss of power and overheating. D
EWALT tools are factory tested; if this tool does
not operate, check power supply.
COMPONENTS (Fig. 1)
WARNING: Never modify the power tool or any part of it. Damage or personal injury could
result.
A. Trigger switch D. Shoe
B. Main handle E. Hand grip
C. Blade clamp release lever
INTENDED USE
This compact variable speed reciprocating saw is designed for professional cutting of wood,
metal, plastic and drywall.
DO NOT use under wet conditions or in presence of flammable liquids or gases.
This reciprocating saw is a professional power tool. DO NOT let children come into contact with
the tool. Supervision is required when inexperienced operators use this tool.
Variable Speed Trigger Switch (Fig. 1)
WARNING: This tool has no provision to lock the switch in the ON position, and should never
be locked ON by any other means.
The variable speed trigger switch (A) will give you added versatility. The further the trigger is
depressed the higher the speed of the saw.
CAUTION: Use of very slow speed is recommended only for beginning a cut. Prolonged use
at very slow speed may damage your saw.
OPERATION
WARNING: To reduce the risk of injury, turn unit off and disconnect it from power
source before installing and removing accessories, before adjusting or when making
repairs. An accidental start-up can cause injury.
Blade Installation and Removal (Fig. 2–4, 7)
WARNING: To reduce the risk of serious personal injury, turn tool off and disconnect
tool from power source before making any adjustments or removing/installing
attachments or accessories. An accidental start-up can cause injury.
Different blade lengths are available. Use the appropriate blade for the application. The blade
should be longer than 3-1/2" (89 mm) and should extend past the shoe and the thickness of
the workpiece during the cut. Do not use jigsaw blades with this tool.
WARNING: Cut hazard. Blade breakage may occur if the blade does not extend past the
shoe and the workpiece during the cut (Fig. 2). Increased risk of personal injury, as well as
damage to the shoe and workpiece may result.
TO INSTALL BLADE INTO SAW
1. Pull blade clamp release lever (C) up (Fig. 3).
2. Insert blade shank from the front.
3. Push blade clamp release lever down.
NOTE: The blade can be installed in four positions as shown in Figure 4. The blade can be
installed upside-down to assist in flush-to cutting as shown in Figure 7.
TO REMOVE BLADE FROM SAW
CAUTION: Burn hazard. Do not touch the the blade immediately after use. Contact with the
blade may result in personal injury.
1. Open up blade clamp release lever.
2. Remove blade.
Proper Hand Position (Fig.1, 5–9)
WARNING: To reduce the risk of serious personal injury, ALWAYS use proper hand position
as shown.
WARNING: To reduce the risk of serious personal injury, ALWAYS hold securely in
anticipation of a sudden reaction.
Proper hand position requires one hand on the main handle (B), with the other hand on the
hand grip (E).
Cutting with Blade in Horizontal Position (Fig. 5)
Your DWE357 is equipped with a horizontal blade clamp. Installing a blade in the horizontal
orientation allows cutting close to floors, walls or ceilings where limited clearance is available.
Ensure that the shoe is pressed against the framing to avoid kickback.
Shoe
CAUTION: Cut hazard. To prevent loss of control, never use tool without shoe.
The DWE357 comes with a fixed shoe that is not adjustable.
Cutting (Fig. 5–9)
WARNING: Always use eye protection. All users and bystanders must wear eye
protection that conforms to ANSI Z87.1.
WARNING: Exercise extra caution when cutting towards operator. Always hold saw firmly
with both hands while cutting.
Before cutting any type of material, be sure it is firmly anchored or clamped to prevent slipping.
Place blade lightly against work to be cut, switch on saw motor and allow it to obtain maximum
speed before applying pressure. Whenever possible, the saw shoe must be held firmly against
the material being cut (Fig. 6). This will prevent the saw from jumping or vibrating and minimize
blade breakage. Any cuts which put pressure on the blade such as angle or scroll cuts
increase potential for vibration, kickback, and blade breakage.
WARNING: Use extra caution when cutting overhead and pay particular attention to
overhead wires which may be hidden from view. Anticipate the path of falling branches and
debris ahead of time.
WARNING: Inspect work site for hidden gas pipes, water pipes or electrical wires before
making blind or plunge cuts. Failure to do so may result in explosion, property damage,
electric shock, and/or serious personal injury.
FLUSH-TO CUTTING (FIG. 7)
The compact design of the saw motor housing and spindle housing permits extremely close
cutting to floors, corners and other difficult areas.
POCKET/PLUNGE CUTTING – WOOD ONLY (FIG. 8)
The initial step in pocket cutting is to measure the surface area to be cut and mark clearly with a
pencil, chalk or scriber. Use the appropriate blade for the application. The blade should be longer
than 3-1/2" (89 mm) and should extend past the shoe and the thickness of the workpiece during
the cut. Insert blade in blade clamp.
Next, tip the saw backward until the back edge of the shoe is resting on the work surface and
the blade clears the work surface (position 1, Fig. 8). Now switch motor on, and allow saw to
come up to speed. Grip saw firmly with both hands and begin a slow, deliberate upward swing
with the handle of the saw, keeping the bottom of the shoe firmly in contact with the workpiece
(position 2, Fig. 8). Blade will begin to feed into material. Always be sure blade is completely
through material before continuing with pocket cut.
NOTE: In areas where blade visibility is limited, use the edge of the saw shoe as a guide. Lines
for any given cut should be extended beyond edge of cut to be made.
METAL CUTTING (FIG. 9)
Your saw has different metal cutting capacities depending upon type of blade used and the
metal to be cut. Use a finer blade for ferrous metals and a coarse blade for non-ferrous
materials. In thin gauge sheet metals it is best to clamp wood to both sides of sheet. This will
insure a clean cut without excess vibration or tearing of metal. Always remember not to force
cutting blade as this reduces blade life and causes costly blade breakage.
NOTE: It is generally recommended that when cutting metals you should spread a thin film
of oil or other lubricant along the line ahead of the saw cut for easier operation and longer
blade life.
MAINTENANCE
WARNING: To reduce the risk of injury, turn unit off and disconnect it from power
source before installing and removing accessories, before adjusting or when making
repairs. An accidental start-up can cause injury.
FIG. 6
FIG. 7
FIG. 9
FIG. 8
1. STARTING POSITION FOR POCKET CUTTING
2. ROCK TOOL UP TO NORMAL CUTTING
POSITION AFTER BLADE HAS CUT THROUGH
MATERIAL.
1. POSITION DE DÉPART POUR COUPE INTERNE
2. PIVOTER L’OUTIL EN POSITION NORMALE DE
COUPE UNE FOIS QUE LA LAME A TRAVERSÉ
LE MATÉRIAU.
1. POSICIÓN INICIAL PARA CORTES CENTRALES
2. BALANCEE LA HERRAMIENTA HACIA ARRIBA
HASTA ALCANZAR LA POSICIÓN NORMAL DE
CORTE LUEGO DE QUE LA HOJA
ATRAVIESE EL MATERIAL.
FIG. 2
FIG. 3
C
FIG. 1
E
D
C
A
B
E
FIG. 4


Find Your Products By Category
Please Login
