

0
Owner's of the DeWalt Lawn Mower Accessory DWE315K gave it a score of 0 out of 5. Here's how the scores stacked up:


ENGLISH
30
Electrical Safety
The electric motor has been designed for one
voltage only. Always check that the power supply
corresponds to the voltage on the rating plate.
Your DEWALT tool is double insulated in
accordance with EN 60745; therefore no
earth wire is required.
WARNING: 115 V units have to
be operated via a fail-safe isolating
transformer with an earth screen
between the primary and secondary
winding.
If the supply cord is damaged, it must be replaced
by a specially prepared cord available through the
DEWALT service organisation.
Mains Plug Replacement
(U.K. & Ireland Only)
If a new mains plug needs to be fitted:
• Safely dispose of the old plug.
• Connect the brown lead to the live terminal in
the plug.
• Connect the blue lead to the neutral terminal.
WARNING: No connection is to be
made to the earth terminal.
Follow the fitting instructions supplied with good
quality plugs. Recommended fuse: 13 A.
Using an Extension Cable
If an extension cable is required, use an approved
3–core extension cable suitable for the power input
of this tool (see Technical Data).The minimum
conductor size is 1.5 mm
2
; the maximum length
is 30 m.
When using a cable reel, always unwind the cable
completely.
ASSEMBLY AND ADJUSTMENTS
WARNING: To reduce the risk of
injury, turn unit off and disconnect
machine from power source before
installing and removing accessories,
before adjusting or changing set-
ups or when making repairs. Be sure
the trigger switch is in the OFF position.
An accidental start-up can cause injury.
WARNING: Risk of lacerations or
burns. Do not touch workpiece or
blade immediately after operating the
tool. They can become very hot. Handle
carefully. Always allow accessories and
workpiece to cool before handling.
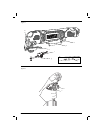
Installing/Removing Accessories
(fi g.2–6)
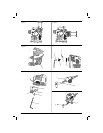
TOOL-FREE ACCESSORY CLAMP (FIG. 2–4)
The DWE315 features a quick change accessory
system. This allows for faster accessory changes
without the need for wrenches or hex keys like other
oscillating tool systems.
1. Grasp the tool and squeeze the accessory
clamping lever (c) as shown in figure 2.
2. Clean any residual debris from the tool shaft
and the accessory holder.
3. Slide the accessory between the shaft (h) and
the accessory holder making sure the accessory
engages all eight pins on the holder and is flush
with the shaft. Ensure the accessory is oriented
as shown in Figure 3.
4. Release the accessory clamp lever.
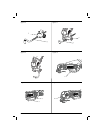
NOTE: Some accessories, such as scrapers and
blades can be mounted at an angle if required as
shown in figure 4.
INSTALLING/REMOVING SANDING SHEETS (FIG. 5)
A diamond shaped platen uses a hook and loop
adhesion system to attach the sanding sheets. The
platen allows you to use it on large flat surfaces and
tight spots or corners.
1. Attach the sanding platen (i) as described under
Installing/Removing Accessories.
2. Align the edges on the sanding sheet, with
the edge of the sanding platen and press the
sanding sheet (j) onto the platen.
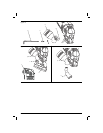
3. Firmly press the base with the sanding sheet
attached against a flat surface and briefly switch
the tool on. This provides for good adhesion
between the platen and the sanding sheet and
also helps to prevent premature wear.
4. When the tip of the sanding sheet becomes
worn, detach the sheet from the platen, rotate
and reapply.
ATTACHING ACCESSORIES USING THE UNIVERSAL
ADAPTER (FIG. 6)
CAUTION: To avoid injury, do not
use any accessory for an application
where the adaptor may fail to hold the
accessory.


Find Your Products By Category
Please Login
