

0
Owner's of the Black & Decker Trimmer Black & Decker Straight Shaft String Trimmer gave it a score of 0 out of 5. Here's how the scores stacked up:


8
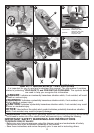
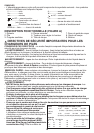
INSTALLING AND REMOVING THE BATTERY PACK
WARNING: Make certain the lock-off button is engaged to prevent switch actuation before
removing or installing battery.
TO INSTALL BATTERY PACK:
Insert battery pack (2) firmly into trimmer until an audible click is heard as shown in figure C. Ensure
battery pack is fully seated and fully latched into position.
TO REMOVE BATTERY PACK: Depress the battery release button in the back of the battery pack and
pull battery pack out of trimmer.
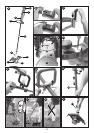
ASSEMBLY AND ADJUSTMENT
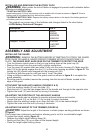
INSTALLING THE GUARD
WARNING: REMOVE THE BATTERY BEFORE ATTEMPTING TO ATTACH THE GUARD,
EDGE GUIDE OR HANDLE. NEVER OPERATE TRIMMER WITHOUT GUARD FIRMLY IN
PLACE. THE GUARD MUST ALWAYS BE ON THE TRIMMER TO PROTECT THE USER.
•Turnthetrimmerupsidedownsothatyouarelookingdownatthespoolcap(9).
• Remove the screw from the guard with a phillips screwdriver.
•Turntheguard(8)upsidedownandslideitfullyontothemotorhousing(6).Makesurethe
tabs (10) on the guard engage the ribs (11) on the motor housing as shown in figure D. The
locking tab (25) should have snapped into the housing slot (26).
•Continue to slide the guard on until you hear it “snap” into place.
•Usingaphillipsscrewdriver,inserttheguardscrewasshowninfigure E to complete the
guard assembly.
•Once the guard is installed, remove the covering from the line cut-off blade, located on the
edge of the guard.
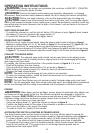
ATTACHING THE AUXILIARY HANDLE (FIGURES F & G)
•Push the auxiliary handle (3) onto the tube (10).
•Slide the bolt (11) into the hex-shaped hole of the handle and through to the opposite side.
•Tightentheknob(12)ontotheboltbyturningitclockwise.
ADJUSTING THE POSITION OF THE AUXILIARY HANDLE
The auxiliary handle can be adjusted to provide optimum balance and comfort.
•Loosentheknob(12)onthebolt(11)byturningitcounterclockwise.
•Gentlyslidetheauxiliary handle up or down the tube (10) to the desired height.
•Tightentheknobontotheboltbyturningitclockwise.
ADJUSTING THE HEIGHT OF THE TRIMMER (FIGURE H)
CAUTION: Adjust the length of the trimmer to obtain proper working positions as shown
in figure I1.
This trimmer has a telescopic mechanism, allowing you to set it to a comfortable height.
To adjust the height setting (figure H):
•Releasetheheightadjustlockingclamp(5).
•Gentlypullthetube(10) up or down to the desired height.
•Closetheheightadjustlockingclamp.
LI-ION Battery Packs and Chargers
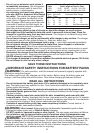
This product can accept any of the batteries and chargers listed in the chart below.
Batteries: LI-ION LBX20
LBXR20
LBXR2020
LB2X4020
Chargers: LI-ION LCS1620
L2AFCBST
L2AFC
Description Cat. #


Find Your Products By Category
Please Login
