

0
Owner's of the Black & Decker Brush Cutter GH900 gave it a score of 0 out of 5. Here's how the scores stacked up:


8
REPLACEMENT ACCESSORIES
CAUTION: Before you begin trimming, only use the appropriate type of cutting line.
Use Black & Decker replacement spool Model No. AF-100, and replacement cap RC-100.
Reload nylon line (either bulk or prewound replacement spool) as shown in this manual.
•USEONLY.065inch(1.65mm)DIAMETERROUNDNYLONLINE.Donotuseserrated
or heavier gauge line, as they will overload the motor and cause overheating. This line is
available at your local dealer or authorized service center.
•Otherreplacementparts(guards,spoolcaps,etc.)areavailablethroughBlack&
Decker service centers. To find your local service location call: 1-800-544-6986 or visit
www.blackanddecker.com.
WARNING: The use of any accessory not recommended by Black & Decker for use with
this trimmer could be hazardous.
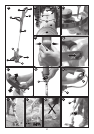
REPLACING THE SPOOL
•Unplugtrimmer.
•Depressthetabs(15)andremovethespoolcap(9)fromthespoolhousing(16)inthe
trimmer head (figure L).
•Forbestresults,replacespoolwithBlack&Deckermodelno.AF-100.
•Graspemptyspoolwithonehandandspoolhousingwithotherhandandpullspoolout.
•Iflever(17)(figure M) in base of housing becomes dislodged, replace in correct position
before inserting new spool into housing.
•Removeanydirtandgrassfromthespoolandhousing.
•Unfasten the end of the cutting line and guide the line into the eyelet (19) figure N.
•Takethenewspoolandpushitontotheboss(18)(figure M) in the housing. Rotate the spool slightly
until it is seated. The line should protrude approximately 5-3/8 inches (136mm) from the housing.
•Alignthetabsonthespoolcapwith the slots (20) in the housing (figure N).
•Pushthecapontothehousinguntilitsnapssecurelyintoplace.
CAUTION: To avoid trimmer damage, if the cutting line protrudes beyond the trimming
blade, cut it off so that it just reaches the blade.
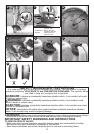
REWINDING SPOOL FROM BULK LINE
(USE ONLY .065 IN. ROUND DIAMETER LINE)
Bulk line is also available for purchase from your local retailer. NOTE: Hand wound spools
from bulk line are likely to become tangled more frequently than Black & Decker factory
wound spools. For best results, factory wound spools are recommended.
To install bulk line, follow the steps below:
•Unplugtrimmer.
•Removetheemptyspoolfromthetrimmerasdescribedin“REPLACING THE SPOOL”.
•Removeanyremainingcuttinglinefromthespool.
•Makeafoldattheendofthecuttinglineatabout3/4inch(19mm)(21).Feedthecuttingline
into one of the line anchoring slots (22) as shown in figure O.
•Insertthe3/4inch(19mm)endofthebulklineintothehole(23)inthespooladjacenttotheslot
as shown in figure P. Make sure the line is pulled tight against the spool as shown in figure P.
•Windthecuttinglineontothespoolinthe direction of the arrow on the spool. Make sure to
wind the line on neatly and in layers. Do not crisscross (figure Q).
•Whenthewoundcuttinglinereachesthe recesses (24), cut the line. (figure P).
•Fitthespoolontothetrimmerasdescribedin“REPLACING THE SPOOL”.
CAUTION: Before you begin trimming, only use the appropriate type of cutting line.
MAINTENANCE
WARNING: To avoid serious injury, switch off and unplug the trimmer before performing
any maintenance.
CAUTION: To assure product SAFETY and RELIABILITY, repairs, maintenance and
adjustment should be performed by authorized service centers or other qualified service
organizations, always using identical replacement parts.
1. Keep the air intake slots clean to avoid overheating.
2. Your trimmer line can dry out over time. To keep your line in top condition, store spare pre-
wound spools or bulk line in a plastic, sealable bag with a tablespoon of water.
3. Plastic parts may be cleaned by using a mild soap and a damp rag.


Find Your Products By Category
Please Login
