

0
Owner's of the Black & Decker Trimmer SF-080 gave it a score of 0 out of 5. Here's how the scores stacked up:

8
•
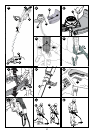
Pull the nylon line spool out and clear any broken line or cutting debris from the spool area.
•
Place spool and line into spool cap with line “parked” in slots provided as shown in figure O1.
• Insertthelineendthroughtheappropriateholeinthespoolcap.Pullslacklinethroughuntil
it pulls out of the holding slots as shown in figure O2.
• PressthespooldownGENTLYandrotateituntilyoufeelitdropintoplaceandthenpush
to snap into place. (When in place, the spool will turn a few degrees left and right freely).
• Takecaretokeepthelinefrombecomingtrappedunderthespool.
• Alignthespoolcaptabswiththeslotsonthespoolhousing(figure P).
• Snap the spool cap back on as shown in figure P by depressing lugs and pressing into
spool housing.
NOTE: Make sure that cover is fully positioned, listen for two audible clicks to ensure both
lugs are correctly located. Power the tool on. In a few seconds or less you’ll hear the nylon
line being cut automatically to the proper length.
NOTE: Otherreplacementparts(guards,spoolcaps,etc.)areavailablethroughBlack&
Decker service centers. To find your local service location call: 1-800-544-6986 or visit www.
blackanddecker.com.
WARNING: TheuseofanyaccessorynotrecommendedbyBlack&Deckerforuse
with this tool could be hazardous.
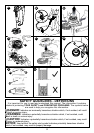
REPLACING THE SPOOL (FIGURES N, O, P, Q)
WARNING: Disconnect the plug from the power source before making any assembly,
adjustments or changing accessories. Such preventive safety measures reduce the risk of
starting the tool accidentally.
CAUTION: To avoid tool damage, if the cutting line protrudes beyond the trimming
blade, cut it off so that it just reaches the blade.
• Depressthetabs and remove the spool cap from the spool housing on the trimmer head
figure N.
• Graspemptyspoolwithonehandandspoolcapwithotherhandandpullspoolout.
• ReplacespoolwithBlack&Deckermodel#SF-080.
• Removeanydirtandgrassfromthespoolandspoolcap.
• Iflever(Q1) in base of spool cap becomes dislodged, replace in correct position before
inserting a new spool.
• Unfasten the end of the cutting line and guide the line into the eyelet (O2).
•
PressthespoolGENTLYintothespoolcapandrotateituntilyoufeelitdropintoplace.Then
push to snap into place. (When in place, the spool will turn a few degrees left and right freely).
• Takecaretokeepthelinefrombecomingtrappedunderthespool.
• Alignthespoolcaptabswiththeslotsonthespoolhousing(figure P).
•
Snap the spool cap back on as shown in figure P by depressing lugs and pressing into spool housing.
NOTE:
The line should protrude approximately 4-13/16 inches (122mm) from the housing.
REWINDING SPOOL (FIGURES R, S)
WARNING: Disconnect the plug from the power source before making any assembly,
adjustments or changing accessories. Such preventive safety measures reduce the risk of
starting the tool accidentally.
NOTE:
USE ONLY .080 inch (2.0 mm) DIAMETER ROUND NYLON MONO FILAMENT LINE. Do
not use serrated or heavier gauge line, as they will overload the motor and cause overheating.
NOTE:
Hand wound spools from bulk line are likely to become tangled more frequently than
Black&Deckerfactorywoundspools.Forbestresults,factorywoundspoolsarerecommended.
To rewind spool, follow the steps below:
• Remove the empty spool from the tool as described in “REPLACING THE SPOOL”.
• Makeafoldattheendofthecuttinglineatabout3/4inch(19mm)(R1).
•
Insert the folded cutting line into the upper hole inside of the spool (R2) as shown in figure R.
• Wind the cutting line onto the spool in the direction of the arrow on the spool. Make sure to
wind the line on neatly and in layers. Do not crisscross figure S.
• Whenthewoundcuttinglinereachestherecesses(R4), cut the line and dock it in the spool
line slots (R5) .
•
Fit the spool cap onto the tool as described in “REPLACING THE SPOOL” (figures O, P).


Find Your Products By Category
Please Login
