
5.0
Owner's of the Makita Planer KP0810 gave it a score of 5.0 out of 5. Here's how the scores stacked up:
4
・ no load speed
・ Class II Construction
・ revolutions or reciprocation per minute
FUNCTIONAL DESCRIPTION
CAUTION:
• Always be sure that the tool is switched off and
unplugged before adjusting or checking function on
the tool.
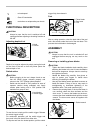
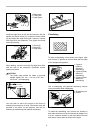
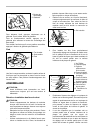
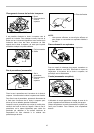
Adjusting depth of cut
1
2
007639
Depth of cut may be adjusted by simply turning the knob
on the front of the tool so that the pointer points the
desired depth of cut.
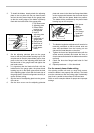
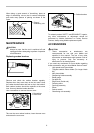
Switch action
CAUTION:
• Before plugging in the tool, always check to see
that the switch trigger actuates properly and
returns to the "OFF" position when released.
• Switch can be locked in "ON" position for ease of
operator comfort during extended use. Apply
caution when locking tool in "ON" position and
maintain firm grasp on tool.
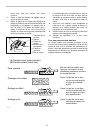
1
2
007709
To start the tool, simply pull the switch trigger. Release
the switch trigger to stop.
For continuous operation, pull the switch trigger and
then push in the lock button from either side.
To stop the tool from the locked position, pull the switch
trigger fully, then release it.
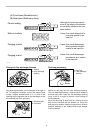
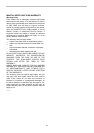
Foot
1
2
3
007688
After a cutting operation, raise the back side of the tool
and a foot comes under the level of the rear base. This
prevents the tool blades to be damaged.
ASSEMBLY
CAUTION:
• Always be sure that the tool is switched off and
unplugged before carrying out any work on the
tool.
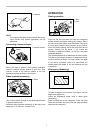
Removing or installing planer blades
CAUTION:
• Tighten the blade installation bolts carefully when
attaching the blades to the tool. A loose installation
bolt can be dangerous. Always check to see they
are tightened securely.
• Handle the blades very carefully. Use gloves or
rags to protect your fingers or hands when
removing or installing the blades.
• Use only the Makita wrench provided to remove or
install the blades. Failure to do so may result in
overtightening or insufficient tightening of the
installation bolts. This could cause an injury.
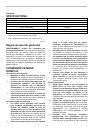
1. Remove the existing blade, if the tool has been in
use, carefully clean the drum surfaces and the
drum cover. To remove the blades on the drum,
unscrew the three installation bolts with the socket
wrench. The drum cover comes off together with
the blades.
1
007641
1. Socket wrench
1. Planer blade
2. Rear base
3. Foot
1. Lock button
2. Switch trigger
1. Knob
2. Pointer


Find Your Products By Category
Please Login
