
0
Owner's of the Makita Cordless Saw Slide Compound Miter Saw gave it a score of 0 out of 5. Here's how the scores stacked up:


[3] DISASSEMBLY/ASSEMBLY
[3]-12. Laser Mechanism (for LS1016L only)
DISASSEMBLING
Note: Makita-operated or authorized repair shops do maintenance of Laser mechanism.
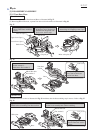
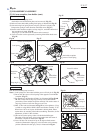
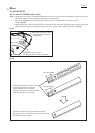
1) As shown in Fig. 13, remove 4x18 Tapping screw and Lead cover holder.
Then disconnect Connectors of Laser circuit from that of Power supply cord, and remove Lead cover.
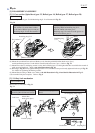
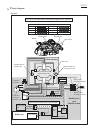
2) Remove Protector, M5x24 Thumb screw and Flat washer 5. (Fig. 62)
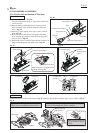
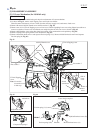
3) Remove one of two CT4x16 Tapping screw on Laser cover. While expanding Laser cover using Slotted screwdriver to
remove two hooks of Laser cover from Blade case and pick up the tail of Laser cover as shown in Fig. 63.
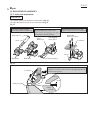
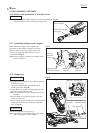
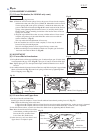
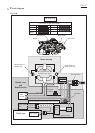
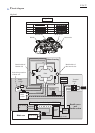
4) Remove M5 Shoulder screw using thin slotted screwdriver. Laser mechanism can be pulled up. (Fig. 64)
5) Remove Compression spring 6 from Laser mechanism. (Fig. 65)
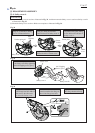
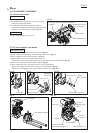
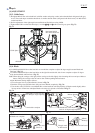
6) Remove M3x6 Pan head screw A and separate Torsion spring 9 (A). Remove M3x6 Pan head screw B and separate
Torsion spring B. (Fig. 66)
Fig. 62
Protector
CT4x16 Tapping
screw
Note: No need to
loosen the screw
in this step.
slotted
screwdriver
Tail of
Laser
cover
Hooks of
Laser
cover
Laser circuit complete
Torsion spring 9 (A)
Torsion spring 9 (B)
Block CBlock C
Block B M3x6 Pan head screw (A)
M3x6 Pan head screw (B)
CT4x16 Tapping screw
Fig. 63
Fig. 65
Fig. 64
P 22/ 37
Repair
M5x24 Thumb screw
Flat washer 5
Flat washer 5
Fig. 66
M5 Shoulder screw
Compression spring 6
Laser
mechanism


Find Your Products By Category
Please Login
