
0
Owner's of the Campbell Hausfeld Car Stereo System NOT FOUND gave it a score of 0 out of 5. Here's how the scores stacked up:
Preparacion
(Continuación)
control del
fluido en sentido contrario
a las agujas del reloj. Observe el
patrón de rociado en la superficie y
ajuste la perilla de control del fluido
hasta obtener el patrón deseado
(atomización) (vea la figura 8).
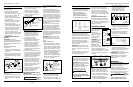
Si el rocío es demasiado fino (malgasto
excesivo), debido al exceso de aire para
la cantidad de pintura que se está
rociando, reduzca la presión del aire o
abra el control de fluído para rociar
más material.
Si el rocio es muy tosco (gotas), reduzca
la cantidad de material con la perilla de
control de fluído o diluya la pintura.
NOTA: Si la pintura se chorrea, está
aplicando demasiada pintura. Si el
acabado luce como una “cáscara de
naranja”, la pintura está muy espesa.
Antes de comenzar a pintar, practique
unos minutos pintando en un cartón
para cerciorarse de que la consistencia
y tamaño del patrón sean los deseados.
21 Sp
Modelos DH3200, DH3800, DH4200, DH5300, IFS530
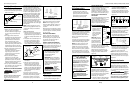
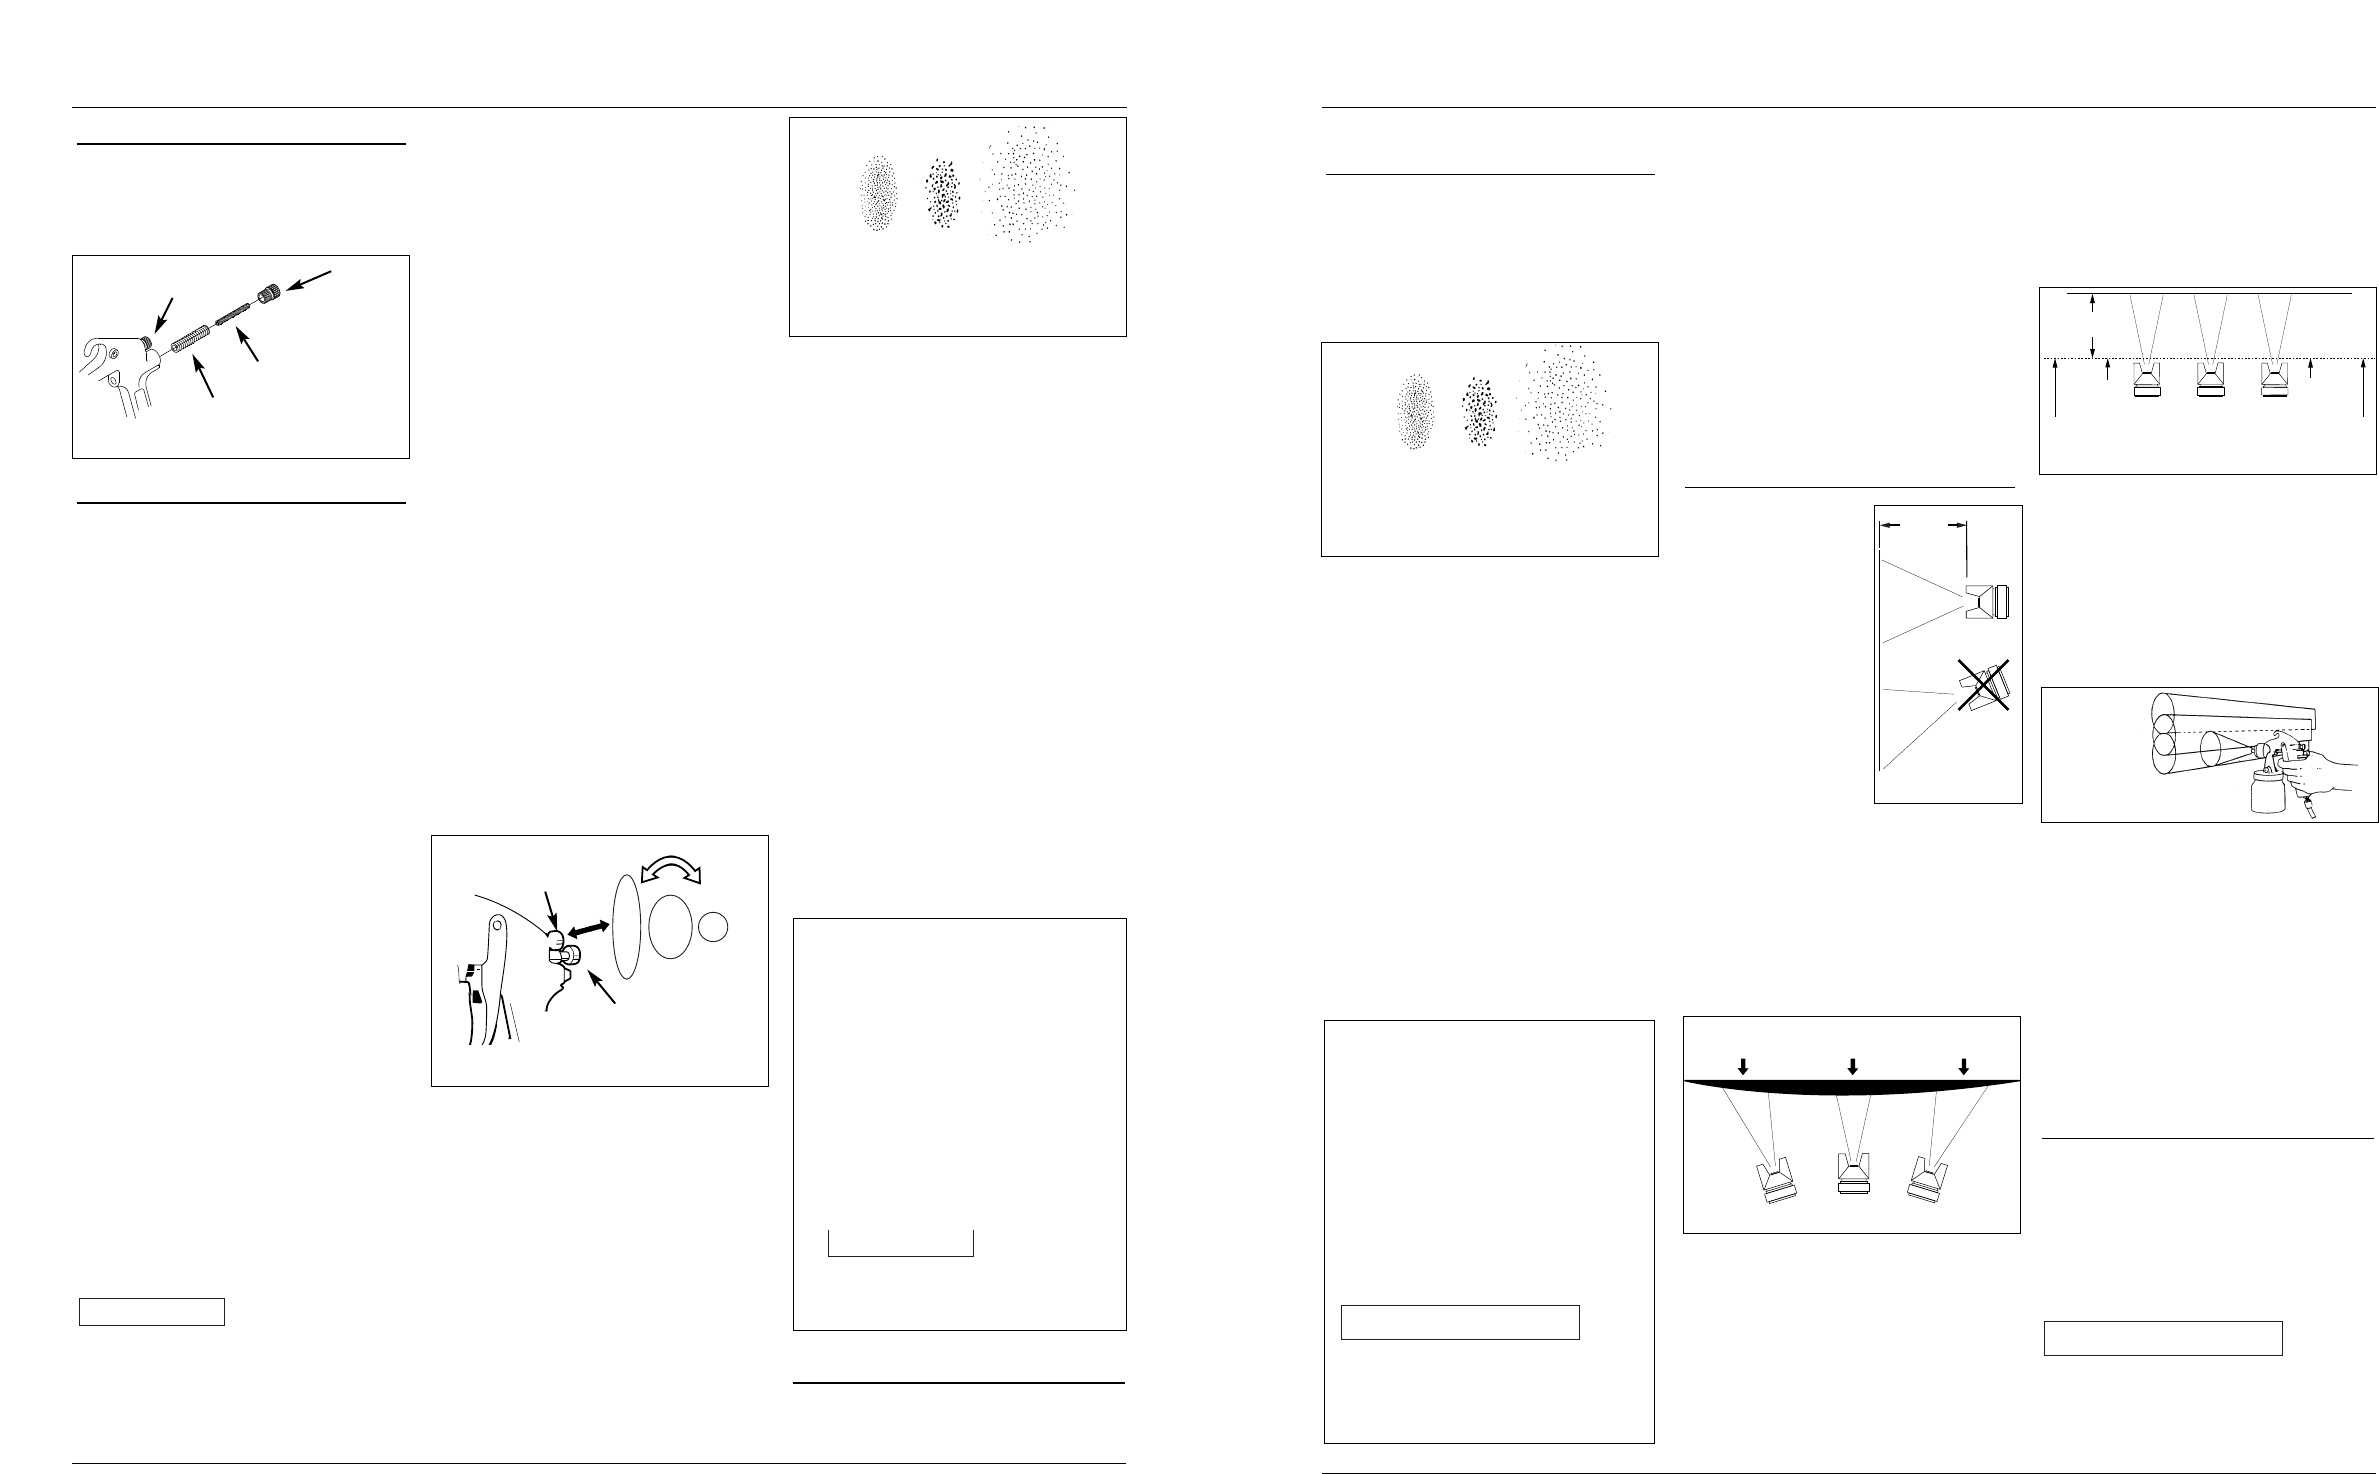
AJUSTES DE DISTANCIA
Comience a 5,98 pulgadas (15,2 cm) de la
superficie de trabajo. Si el patrón
empieza a chorrearse, retroceda una
pulgada y pruebe otra vez. El patrón
quedará seco y delgado y puede sentirse
tosco al tacto si se rocía desde muy lejos.
AJUSTES DE LA VELOCIDAD DE
APLICACIÓN
Si la velocidad de aplicación es muy lenta,
la pintura quedará húmeda en la
superficie de trabajo y puede chorrearse.
Si la velocidad de aplicación es muy
rápida, la pintura se secará y no quedará
pareja en la superficie de trabajo.
Funcionamiento
1. Comience a rociar.
Siempre mantenga
la pistola en los
ángulos correctos
con el movimiento
de la muñeca para
pintar. (Vea la
Figura 9).
NOTA: No mantenga
la muñeca fija cuando
esté usando la pistola,
ni pinte moviendo la
pistola en arcos como
un abanico. Este tipo de movimiento
acerca la pistola a la superficie y crea
dépositos de pintura que se concentran
en el centro del área cubierta
aplicando muy poca pintura en los
bordes. Ésto ocasionaría un acabado
irregular y de mala calidad (Vea la
Figura 10).
Mantenga la boquilla de 6 pulgadas a 9
pulgadas (15,24cm a 22,86cm) de la
superficie que va a pintar todo el
tiempo y siempre mantenga la pistola
en movimiento mientras esté rociando.
Si para de moverla la pintura se
acumulará y se “chorreará”.
2. “Oprima el gatillo” adecuadamente.
Comience a mover la pistola ANTES
DE OPRIMIR EL GATILLO y deje de
oprimirlo ANTES DE PARAR DE
MOVERLA. Este procedimiento le
permitirá que el acabado sea parejo
sin dejar rastros de donde se unen las
diferentes manos de pintura (Vea la
Figura 11).
3. La cantidad de pintura aplicada
puede variar según la velocidad del
movimiento, la distancia entre la
pistola y la superficie y los ajustes de
la perilla de control de fluído.
4. Los empates entre cada mano deben
ser suficientes para obtener un acabado
parejo al final (Vea la Figura 12).
5. Use un pedazo de cartón como
protección para evitar que la pintura
caiga fuera del área que desea cubrir.
Si es necesario, use cinta pegante
(tirro) para cubrir otras áreas.
NOTA: Dos manos de pintura no muy
espesas le darán mejores resultados y
menos posibilidades de que la pintura
se chorree que si usa una mano espesa
de pintura.
Mantenimiento
LIMPIEZA DIARIA
Los códigos locales tal vez le exijan que
utilice ciertos equipos y métodos de
limpieza. Siga los códigos locales y las
recomendaciones del fabricante para el
uso y el desecho de materiales rociados
y solventes.
Limpie la
pistola
pulverizadora inmediatamente después
de terminar de usarla. La pintura y
otros materiales se secan rápidamente
dentro de los ductos pequeños y ésta
AVISO
15,24 cm
a
22,86cm
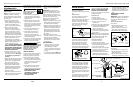
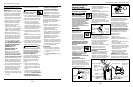
Figura 9
Correcto
Pintura
Muy
Espesa
Pintura Muy
Clara (Diluida)
Figura 8 - Consistencia del patrón
(Atomización)
PRESENCIA DE AGUA/ACEITE EN EL
AIRE COMPRIMIDO
Todos los cabezales expulsan cierta
cantidad de agua condensada, aceite o
contaminantes con el aire comprimido.
IMPORTANTE: Esta condensación
ocasiona un acabado disparejo al
pintar. Le recomendamos que instale
el equipo (tal como filtros y
secadores) y controles necesarios
para remover agua/aceite.
Si no
instala el equipo adecuado para
remover agua/aceite podría dañar la
maquinaria o superficie que esté
pintando .
AVISO
Muy Poca
Pintura
Demasiada
Pintura
Figura 10
INCORRECTO
Muy Poca
Pintura
15,24 cm a
22,86cm
Oprima
el Gatillo
Comienzo
Suelte el
Gatillo
Final
Figura 11
Figura 12
material flowing through the gun. (Turn
the knob clockwise to reduce flow,
counterclockwise to increase the flow.)
This adjustment depends, in part, on the
amount of air flowing through the gun.
Air flow can be adjusted only at the
compressor’s pressure regulator. Spray
test patterns on scrap cardboard with
gun 8” away from surface. Trigger
short, one second bursts and make
adjustments with this knob until the
pattern is the desired oval shape and the
material is evenly distributed on the
surface with no heavy or thin spots. The
pattern should feather out at the edges
(See Figure 8).
NOTE: If there is sagging, too much
material is being applied. If there is an
“orange peel” effect, the material is
too thick.
MODEL DH5300/IFS530
1. Adjust air pressure to the spray gun
according to the recommendations
supplied with the spray material. This
air pressure usually falls between 30-
50 PSI.
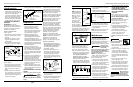
2. Set pattern size to desired shape. For
full pattern, open pattern control
knob by turning counterclockwise.
For a round pattern, turn pattern
control knob clockwise (See Figure 7).
3. Turn fluid control knob fully clockwise
until closed.
4. With gun 8” away from surface,
trigger a short, one second burst
while turning fluid control knob
counterclockwise. Observe the spray
pattern on the target and adjust the
fluid control knob until the desired
pattern (atomization) is obtained
(See Figure 8).
If the spray is too fine (excessive
overspray), caused by too much air for
the amount of paint being sprayed,
reduce the air pressure or open the
fluid control to spray more material.
If the spray is too coarse (spitting globs),
reduce the amount of material with the
fluid control knob or thin the material.
NOTE: If there is sagging, too much
material is being applied. If there is an
“orange peel” effect, the material is
too thick.
Before spraying the workpiece, practice
a few minutes on a cardboard target to
ensure the pattern consistency and size
are set correctly.
DISTANCE ADJUSTMENTS
Start 6” away from work surface. If
pattern begins to run, move back an
inch and try again. The pattern will be
dry and thin and may feel rough if
sprayed from too far away.
SPEED OF STROKE ADJUSTMENTS
If speed of stroke is too slow, paint will
be wet on work surface and may run. If
speed of stroke is too fast, paint will be
dry and uneven on work surface.
Operation
1. Begin spraying. Always keep the gun
at right angles to the work by flexing
your wrist while making the paint
Set Up (Cont.)
replaced if necessary to convert back
to a non-bleeder type arrangement.
4. Insert fluid needle spring and replace
fluid control knob.
Preparation
MATERIAL PREPARATION
1. Before using desired material in the
spray gun, spray a compatible
thinner or solvent through the gun
to remove any contaminants and
residue.
2. Thoroughly mix the material in
accordance with the manufacturer’s
instructions. If necessary, thin per
paint manufacturer’s instructions.
Strain material through a paint
strainer. Test the consistency of the
material by making a few strokes on a
cardboard target. Be sure the spray
material is clean and free from lumps.
3. Fill the canister about 3/4 full with
material and start the air
compressor. Be sure the hose(s) is
long enough to allow a full
movement of the gun across the
surface to be painted.
4. Be sure that the air pressure
regulator is set for the proper
operation of the gun. Refer to the
specifications section. Air pressure
should be checked at the spray gun
inlet with the trigger pulled.
5. Set up a piece of cardboard or other
scrap material to use as a target and
adjust for best spray pattern.
MATERIAL & PATTERN ADJUSTMENTS
Always test spray
gun on scrap
material to avoid damage to
workpiece.
MODELS DH3200, DH3800 & DH4200
The fluid control knob will control
trigger travel and the amount of
NOTICE
4
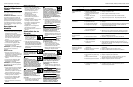
General Purpose Spray Guns
Pattern Control Knob
Fluid Needle Spring
Air Valve Spring
Fluid
Control
Knob
Figure 6
Figure 7 - Pattern Size
Pattern
Control Knob
Fluid Control
Knob
www.chpower.com
Correct Paint Too
Thick
Paint
Too Thin
Figure 8 - Pattern Consistency
(Atomization)
WATER/OIL IN COMPRESSED AIR
All compressor pumps discharge
some condensed water, oil or
contaminates with the
compressed air.
IMPORTANT: This condensation
will cause “fish eyes” to appear in
the paint job. Install appropriate
water/oil removal equipment (such
as filters and dryers) and controls as
necessary for the intended
application.
Failure to
install
appropriate water/oil removal
equipment may result in damage
to machinery or workpiece.
NOTICE


Find Your Products By Category
Please Login
